Friday, February 26, 2010

Friday Styles: For the Dogs

Most of the time, writing this blog is one of the high points of my day. It is my hobby and my great escape. But, for some reason, all the pleasure and joy I take in blogging goes out the window on Fridays, like a miracle in reverse. So my latest solution to this problem is to start a new feature: Friday Styles. These posts will feature something that I own that I think is awesome, and that I think you should probably buy, too. Hopefully, this will also help me rediscover all the great stuff I have stashed away in my place, and remember to be grateful for it. I hope you enjoy.

I know that ever since we adopted our beagle, Skipper, I have turned into one of those new parents who gushes over every silly thing their little darling does as if it's worthy of national media coverage. I mean, I think my dog is a genius and the cutest thing that ever lived, but I'm not so far gone that I don't realize that you might not share my opinion when she jumps onto your lap, rips your tights and licks your face with kibble-breath.
And, as much as I love man's best friend, I was very resistant to all of the accessories one is required to acquire when one invites a canine to share one's abode. I tried to go minimalist, but once we got the crate, the bed, the bag, the bowls, the food bins, the baby gate, the leashes and, ugh, doggy clothes into our apartment, I realized that a 19-lb dog actually requires 100 lbs of junk. As I pondered this, I heard JM emit a long, tortured sigh from the other side of the mountain of dog stuff.
Happily, I found a charming and rich-looking dog bed that looks perfect on the oriental rug in our living room, at, of all places, Petco, for just $49. So much better looking than most of the standard-issue options, it's a plush, comfy spot where Skip loves to lounge. It's rugged enough that I can just run the vacuum over it, and the cover is removable, so I can wash it if it ever gets truly filthy. It's Skip's second-favorite place to sit in the living room. After your lap.

Thursday, February 25, 2010

No Ifs, Ands or Buttons

Maybe we haven't known each other that long, but I like you, and I don't want to see you played for a fool. That's why I think it's imperative that you stop throwing your money away sending clothes to the tailor that you could easily fix yourself for free. You know who you are- your skirt gets a little droopy hem, or you pop a spaghetti strap on the dance floor, or, worst of all, a button falls off your fave cardy, and you immediately go running to the professionals.
All of these sewing tasks are totally simple and entirely doable by you as long as you have a very basic sewing kit and at least one finger and thumb. And each of them can be accomplished in the time it takes one American Idol contestant to butcher your favorite song (you might even be grateful for the distraction).
Luckily, I found this illustration on Esquire.com, and I figure if their readers are up to the task of rebuttoning themselves, so are mine. So I stole it, because I am not above theft when it comes to helping my friends. Don't worry, you can pay me back later.


Step 1. Thread your needle with a thread that matches the button (or whatever color has been used on the other buttons) Don't worry if the color is slightly off (i.e. navy vs. black)- no one will ever notice. Double the thread over and tie the ends together in a knot. Find the exact spot where the button should go by matching it up with the button hole. Insert the needle through the fabric from the back (so the knot doesn't show on the front), and stitch an "X" to anchor the button.

Step 2: Thread the needle through one of the holes in the button (if the button has 4 holes, take note of how the garment's other buttons are sewn on- do the stitches form an "X" or two parallel lines- you will want to copy it so this button matches). Then stitch up and down through the holes in the button and the fabric loosely at least 4 or 5 times, keeping the button pulled about 1/8 - 1/4" away from the fabric (you can insert a toothpick or matchstick to help you keep the right distance).

Step 3: When the button feels well affixed, thread the needle down through one of the holes in the button, but not through the fabric, so the thread is coming out from between the button and the fabric. Then wind the thread around the loose stitches several times (this creates a "shank" and leaves enough space for the button hole without putting pressure on the fabric).

Step 4. Insert the needle through the wound shank you have created a few times, securing the thread. Snip the loose thread near the shank with scissors so there are no loose ends. Ain't that a kick in the buttons?

Here's a bonus tip: Keep a glass jar with a lid (like a mustard or baby food jar) in your sewing kit. When a garment comes with extra buttons, add them to the jar. Pretty soon you'll have a large enough collection to replace almost any fastener that goes missing. Plus a jars of buttons make for pretty cute objets in my fantasy craft room.

Photo credit: Country Living
Illustration credit: Esquire.com

Wednesday, February 24, 2010

Ask Me Anything: Meet The Parents

In case you are new here, Ask Me Anything is a feature on this site where I field reader questions to the best of my ability. The questioners get moderately useful information, and I get out of thinking up my own topic for one day, and get to act like a total know-it-all. So everybody wins. Email your own burning questions to lily@acharmedwife.com, or leave a comment on the site, and I will do my best to relieve the burning. For today's installment, we hear from reader Stephanie.

Hi Lily,
I love your blog and have a burning question to which I cannot find a solid answer online.
Here's the situation: I'm meeting my boyfriend's parents for the first time. Scary. They live out of town, so it is a flight for us there and we will be staying with them for the weekend. Could you possibly do a column with some advice for this case? What is a nice gift to bring (that travels well to boot) without it looking like I tried too hard?
Any advice you could offer would be greatly appreciated!
Thanks so much,
Stephanie

Dear Stephanie,
I feel your jitters- there are few experiences in this world as nerve-wracking as the first time you meet a boyfriend or girlfriend's parents! Countless sitcoms (and more than a couple of very funny movies) have plumbed the topic- exploring the worst-case scenarios, and freaking people out the world over. But, while it is a momentous occasion (after all, if all goes well, these could be your children's grandparents), meeting mom and pop doesn't have to be a terrorizing experience, and can actually be a lot of fun. And if you're as lucky as I am, you might just end up with a couple of really wonderful new friends.
But don't worry, even if it isn't an immediate love connection between you and the folks, you will most definitely be able to find some things you like or admire about his parents. After all, these are the people who raised the man you love, right? And the good news is that they will most likely be coming into this a little nervous about meeting you, too.

Here are some things to keep in mind while you're there:

Come Bearing Gifts: You have the right idea about showing up with a gift. Your boyfriend should be able to help you out on this by telling you what they like- for example, if they are into cooking, the latest gadget from Sur La Table, personalized aprons or a cookbook is nice. If they like gardening, try some cute his-and-hers gardening gloves or a pretty potted plant (delivered ahead of time), or, if they are oenophiles, a pretty silver wine stopper or monogrammed coasters are nice. A gift that shows that you have asked about them gives you an easy way to get them talking about their passions, and shows you care. If your boyfriend doesn't provide any inspiration, you can't go wrong with a gift basket of gourmet foods from Dean & DeLuca (or local specialties from your town). I'd avoid anything decorative until you get a look at their house and know their tastes. And don't forget to send a sweet thank-you note after it's all over telling them what a wonderful time you had (even if it was like 48 painful hours of dental surgery).
Live By Their Rules: Sleep where they tell you to- a couple of nights in separate beds won't kill you. If they take their shoes off in the house, you do it, too. If you're allergic to their beloved Siamese, take a Claritin, grab a tissue, and power through it and (unless you actually get hives or something) and try not to complain- it's just a couple nights. Keep your room tidy, make your bed every morning, and don't spend 45 minutes in the shower.
Do What They Want To Do: You're there to spend time with his folks- don't try to impose your own timeline or demands on them. Eat when and where they want to eat, watch the hockey game they want to watch, and just go along with it when his mom insists on showing you twenty photo albums of your beau in his Urkel phase. Be a good sport, smile and laugh, and you may find you're actually having a good time. There are limits, though: If you're a vegetarian, you certainly don't have to choke down a rib-eye - just take a bigger helping of mashed potatoes and be gracious about it.
Cut Him Some Slack: Something about stepping into their parent's house can transform the most mature, successful man into a whiny and moody tween. Bite your tongue when he lets his mom do his laundry or bring him beers on the couch. Respect that he's probably nervous too, and realize you aren't going to win any points with his parents by nagging or berating him in front of them (you can give him hell for not telling them that you're a vegetarian when you get home).
Be Helpful: Offer to set or clear the table or help however you can. Since I mostly see my in-laws around holidays, I actually love cooking and doing dishes with my mother-in-law, since that's where we get to really chat and catch up in all the hustle and bustle. But if they insist you sit down and stop helping, don't push your help on them- they might take it the wrong way.
Be Polite, But Not Stiff. When in doubt use the "Mr. and Mrs." until they instruct you otherwise (but once they tell you to, do use their first names). They want to get to know what you're like- don't get shy or clam up completely in their presence. Feel free to crack a joke or two (or at least a smile), and tell them about yourself. But don't be too hard on yourself if you aren't perfect. The first time I met my in-laws, I talked non-stop through dinner, then forgot my bag under the table when we left and had to go back to the restaurant to get it. So they learned pretty quickly what a spazz I am, and, happily, they seem to like me anyway.

Honestly, Stephanie, the fact that you even had the consideration to write this question shows me that you have nothing to worry about- relax and be yourself, you're going to be just fine!

photo credit: via Song of the Exile

Monday, February 22, 2010

The "Right Now" Rule

I'm a world-class procrastinator. For instance, I've been meaning to write this post all day, but instead I have found a million other things to do: Responding to emails, walking the dog, playing Facebook Scrabble, folding laundry and watching "The Age of Innocence" on HBO, all of which took precedence. I've been known to go a full year between haircuts, and sometimes I don't make the bed until right before we're going to get back into it. It's not that I'm lazy, it's just that I'm... well, okay, sometimes I'm kind of lazy.
However, when it comes to house cleaning, I've discovered that sometimes the truly lazy thing to do is to tackle things right away. No, I'm not trying to be intentionally ironic here (like some creepy hipster with a lumberjack mustache) - bear with me and I'll explain. In the process of trying to minimize the actual amount of time I spend performing tedious housecleaning tasks, I've discovered that the sooner you tackle a mess after it is made, the faster and easier it is to clean up. For example, it only takes a second to rinse the bowl and spoon after you finish your oatmeal in the morning, but if you leave them in the sink all day instead, you will be scraping that gunk off for days. Or when you spill a little cake batter on the cabinet, you can either grab a paper towel and wipe it off easily now, or spend valuable TV-watching hours scouring it with a scrunge later, once it has hardened and adhered itself to the paint. The same goes for pasta sauce on your favorite blouse, mud on your galoshes, or red wine on the slipcovers - I call it the "Right Now" Rule. As tempting as it can be to leave a mess for later, I always remind myself of all the time and effort I will save by getting my patooti off the couch and dealing with it immediately. The long-term laziness in me can usually beat out the short-term. (The only acceptable exception to this rule is when you have guests - nothing kills a party like having the hostess down on her knees scrubbing cocktail sauce out of the rug - it can wait, just this once). Once you get in this good habit, you'll find yourself with a cleaner house, less frustration, and plenty of extra time on your hands that you can blissfully and guiltlessly waste. Scrabble, anyone?

P.S. Happy birthday to my wonderful big brother!
photo credit: Country Living

Friday, February 19, 2010

Paperless Press: Online Magazines


I've always been a little bit obsessed with magazines- I think it all started with my subscription to Highlights for Children when I was six. Since then, I've been a faithful reader of all kinds of magazines- first Jane and Seventeen, then Cosmo, Travel and Leisure, Bon Appétit, Vanity Fair, Real Simple, and even my college boyfriend's Maxim, to name a few. I even worked at Martha Stewart Weddings for four years after graduating college, so great was my love of the printed word (and picture).

But the last couple of years have been tough ones for magazine lovers- one of my faves Domino went under, and then Condé Nast folded the institution Gourmet and several other titles. It was chaos- there was a confetti of glossy paper falling from the sky and ink was running in the streets. I started hoarding my collection of mags, and trolling eBay for the ones I'm missing. But last fall, amid this magazine apocalypse, a bright spot, and an exciting new genre arrived on the scene: the online magazine. As someone who loves the feel and smell and dogear-ability of a physical magazine, I was skeptical at first, but these publications have won me over, and, if they haven't already, they will get you, too. First of all, they take up no space in your apartment (and therefore require no justification to your husband), they are filled with beautiful ideas, and they're free! What's not to love?

Here are the two online mags I am obsessed with right now:
Lonny, a home and shopping mag from a former Domino editor, just released it's third issue, and seeing it posted, I admit I felt that same warm rush I felt when a "real" mag arrived in my mailbox.
And Nonpareil, an online weddings mag is filled with great ideas for all kinds of parties and entertaining, comes from the girls behind the Inspired Bride and Paper Crave blogs.

I guess it's time I get with the times. Turns out even Highlights has a website.

Thursday, February 18, 2010

Crustacean Adoration

I love to cook dinner for my husband, but I'm always trying to strike that balance between keeping it economical (otherwise, why not just order in?), keeping it healthy, and keeping it interesting. But in the two and a half years that we've been married, I have started to feel like I'm running low on options: We both try to limit the red meat we eat, fish gets expensive (and smelly), and I've cooked so much chicken, it's a wonder we both haven't sprouted feathers. But the other day in the grocery store's frozen section, I stumbled upon a brand new idea that really has legs: bags of frozen shrimp.
Don't ever waste your money on the "fresh" shrimp at the seafood counter- as a matter of practice, all shrimp are flash frozen, (they have just pre-thawed them) so this is one case in which buying frozen is the right move. A bag of frozen shrimp is about $10-15 at the store, which may seem pricey, but there are enough shrimp in there for 4 to 5 meals for two (taking you down to, like, $3/meal). And since you can cook the shrimp from frozen, you can quickly and easily just grab the amount of shrimp you want, reseal the bag, and put the rest back in the freezer.
There are at least a hundred delicious meals you can make with your shrimp (not to mention my favorite old-school appetizer of all time, shrimp cocktail). Here are just a few of the dinners I have gotten out of one bag of shrimp, but this versatile and delicious crustacean goes well on just about anything- the sky's the limit. Or maybe the bottom of the ocean is the limit. Whatever.

Shrimp Scampi: Quickly boil and peel your shrimp, then saute them with butter, minced garlic, lemon juice and white wine. Serve over pasta or rice, and top with Parmesan cheese. Shrimp Tacos: Boil and peel shrimp according to package directions. Serve in warm tortillas with cheese, black beans, shredded cabbage, and pineapple salsa. Shrimp Cobb Salad: Cook shrimp according to package. Serve on top of greens with hard-boiled eggs, avocado, tomato, blue cheese and bacon (if you like). Top with vinaigrette. Shrimp Rolls: Boil and peel the shrimp, and then run under cold water until cooled. Cut up the shrimp to small pieces, and combine with minced red onion, celery, parsley and mayonnaise. Serve on toasted and buttered hot dog buns.

Uh-oh, I think I might be growing an exoskeleton.

photo credit: myrecipes.com

Wednesday, February 17, 2010

Super Bowl

Here's another very useful little tip I picked up during my brief stint in cooking school. You may have noticed that I don't have a lot of good habits in the kitchen, so when I actually do something properly, I like to brag about it. Kind of like when I wear socks that actually match, and I insist on pulling up my pant legs to show them to my husband and go, "What do you think? Nice, right?"

While preparing a meal, I always place a big mixing bowl next to my cutting board into which I dump the wrappers, onion skins, and veggie scraps that I discard during cooking. Even though there is a garbage can right in my kitchen island, it really saves a surprising amount of time and effort using the bowl, instead (plus, I don't have to touch the cabinet door with tomato juice or nasty chicken goo on my hands). I also like being able to peel things over the bowl, which keeps my cutting boards and counter tops cleaner while I cook. This is pretty standard practice in restaurant kitchens, where they really have to be efficient and organized.

I have since learned that Rachel Ray does this on her show, as well, and even sells a special "garbage bowl" in her product line on QVC. But let me assure you about two things I know for sure: She was not the inventor of this idea - some genius cooking Frenchman was, many many, years ago. And pretty much any old bowl will do- you don't need to start watching television home shopping channels to get in on this action (although I would stick to metal, glass or ceramic- plastic can get scratches that trap bacteria). Just use something you've already got, and remember to throw it in the dishwasher afterward. Try it- it may just bowl you over.

Tuesday, February 16, 2010

A Win-Win Situation: Graphic Image Giveaway Winners!

And now the moment we've all been waiting for: the announcement of the winners of this weekend's Graphic Image giveaway! For those curious about how I chose the winners, I used this random number generator to pick for me. That way, I didn't have to judge your responses on perceived "quality", or how much I agreed with your trip ideas (and wanted to take the same trip and stay in an adjoining hotel room from you make my husband duet on singing "A Whole New World" to you through the air vents every morning. Sounds fun, huh?).

Anyway, without further ado:

2nd Prize, of a passport color in your choice of leather and color with your monogram if you choose, goes to Entry # 14, "S" who can use it for her dreamy getaway to Australia (or Salt Lake City. Either one. Or both. Although you don't need a passport to go to Salt Lake City. Unless you live in another country).

1st Prize, of a gorge leather travel clutch (in your choice of leather and color), goes to entry #23, Jamie!

Congratulations, ladies! Email me at lily@acharmedwife.com to claim your goodies, you lucky ducklings!

And for those of you who didn't win, don't forget that Graphic Image is having a massive sale right now, and you can get free shipping with the code "charmedwife" through the end of the month. And, remember, you're all winners to me.

Happy travels!

Monday, February 15, 2010

Happy President's Day!


I hope I shall possess firmness and virtue enough to maintain what I consider the most enviable of all titles, the character of an honest man. - George Washington

Sunday, February 14, 2010

Happy Valentine's Day!


Among those whom I like or admire, I can find no common denominator, but among those whom I love, I can: all of them make me laugh.
~W.H. Auden

Friday, February 12, 2010

Everyday Romance

Now is the time of year when the drug stores are chock full of candy hearts and cheesy cards and people start going loopy for rose petals and chocolates, and Victoria's Secret is crowded with uncomfortable men trying to guess what size their gals wear. But romance shouldn't be confined to the first two weeks of February. Here are some things you should do all year to let that special lady or fella know how you really feel. A little goes a long way.

Everyone:
Just consider each other. If you're going to be late, call. If you find yourself trying to make your significant other feel dumb, or unworthy, or guilty, ask yourself why. If you were wrong always always own up and apologize. Laugh at yourself. Make an effort to get to know their friends and family (and cat). Watch the Real Housewives (or Sunday Night Football) with him or her, even though you don't want to. Have a date at least once a week (even if it's just a walk in the park, or a Chinese take-out picnic on the floor). Stop what you're doing and greet one another with a kiss when you get home from work. Put down the damn phone. When you run into someone, introduce him or her. Listen. No, really, listen. Do your best not to fart or burp or pick your nose in front of them- once that door is opened, you can't close it again. Remember to be grateful that they love you (and say "thank you" now and then.) Remember: not every argument is worth having - choose your battles, and choose to have fewer of them.

Gals:
Sometimes when you feel like saying "no" say "yes" instead. You won't regret it. Sometimes when you feel like wearing the cotton granny-panties, wear the silky thong instead. Sometimes when you feel like saying "pick up your stupid socks, stupidhead!," say, "I love you, stupidhead". Don't call him a hundred times when he's out with his friends. Don't panic if he's going to a strip club for a bachelor party. If you act jealous, needy, and annoying, you'll only make him want to get away from you.

Fellas:
Even if she's tough as nails, and can take you at arm wrestling, she still wants to be made to feel like a lady. Don't stress out about rules (who goes first through a revolving door, again?)- just use your instincts and be kind. If she seems cold, offer her your jacket. Buy flowers just because (sometimes they mean more when it's not a special occasion). Change the lightbulb she can't reach without being asked. When she gets dressed up, tell her she looks pretty (it helps sell it if you really look at her first). Build a fire on a cold night. Be the outside spoon.

The greatest thing you'll ever learn is just to love and be loved in return. - Eden Ahbez

Thursday, February 11, 2010

Give It Away Now: Graphic Image Giveaway!

As you read this, I am probably en route on an odyssey that began with a 6-hour drive to Pittsburgh, which will (if all goes according to our insane plan) be followed by three flights, which will put us in Jackson Hole late tonight for a weekend of skiing. But, defying reason or logic, I'm actually happy as a clam about it, because I love to travel. No matter what goes wrong, or how things get messed up, I know I will be sharing an adventure with the man I love, on my way to ski with our wonderful friends in a beautiful place. And that's the amazing thing about travel- sometimes the bad stuff turns out to be good stuff, if you're able to roll with the punches.


Which brings me to my exciting news! One of my favorite companies for leather travel accessories (as well as journals, books and home accessories), Graphic Image, is having their huge annual Winter Sale, with most of their products on sale for up to 75% off. I have shown some of their smaller leather goods before, in a post about great gifts for friends, hostesses and other special occasions, but you have to go on their site to see the full range of beautiful photo albums, frames, wallets, address books and gifts they make for yourself. The mind boggles. And as a special gift for my readers, enter promo code "charmedwife" at checkout and get free shipping until the end of February, too!

But that's not all! The lovely folks at Graphic Image (www.graphicimage.com) like you so much that they have also offered to give some of their gorgeous travel products to me to give to you!

First prize is a gorgeous leather travel travel clutch (upper left, above), valued at $139. You even get to choose the color, you lucky duck.
Second prize is a super-cute leather Passport cover (lower right, above), which retails for $48. Again, you get to take your pick of all their pretty colors, and they will slap your monogram on it, too, if you want. Consider it a little valentine from me to you, my loves!

TO ENTER: Between now and midnight EST on Monday night, February 15, leave a comment (no anonymouses allowed for this one- you've got to leave me an email address!) telling me about where you would go if you could travel anywhere in the world, and you will be entered to win a random drawing for one of the two awesome, amazing prizes above! (One entry per person, please).

PS: Happy Birthday, Daddy! xxooxxoo

Wednesday, February 10, 2010

Travel Tip #005: Liquid Assets

I am in the midst of my own personal travel saga, which began when our flight to go skiing in Jackson Hole for the weekend was canceled this morning. We have managed to rebook ourselves on our own personal version of Planes, Trains, and Automobiles (I'm the John Candy, JM is the Steve Martin), with an insane itinerary that includes all three of those modes of transport, as well as, ultimately (hopefully), skis.

But while I can't be sure that this crazy travel schedule will go off without drama or hitches, at least I learned a new trick to control the chaos inside my bags. Is there anything worse than when you open up your suitcase after a long day of travel and find that your shampoo has leaked all over your clothes? You may have taken one look at the gooey mess pooling under your silk dress and thought, "Why?" I'll tell you why: It's a little thing I like to call "Science". See, when you pour your shampoo (or lotion, or whatever weird beauty aids you are bringing with you) into those little travel bottles, you unwittingly are either overfilling them, or leaving air in there. When the plane climbs to higher altitude, there is less external air pressure on the bottle, allowing the liquids and contained air to expand. All that expanding stuff (yes, that is the technical term for it) has to go somewhere, so it pushes out of the bottle and onto your Jimmy Choos.
Next time, when you fill the bottle, leave a little room in it. Then, before you screw on the cap, squeeze all the air out of the bottle, creating a vacuum (the bottle should look a little caved in). Now, when the liquid expands, there is room for it in the bottle, and that's where it will stay.
Kind of like how I'll be in the Cincinnati airport tomorrow, I suspect.

P.S. Check back tomorrow for an exciting announcement. What is it? I'll never tell. Well, not until tomorrow, anyway.

Monday, February 8, 2010

The Great Closet Clean-Out


Anyone who has lived in Manhattan (other than you, Donald Trump) is familiar with the concept of the "all-purpose closet". Because closet space (well, space in general, really) is at such a premium, you end up forcing disparate categories of your stuff to cohabitate in closets. In my old apartment, for instance, the sheets and towels lived on the top shelf of a closet that also housed our liquor cabinet, garlic, potatoes, and onions, and our cleaning products. It was a foul and potentially toxic combo, but an unavoidable one. In our new apartment, we are a little better positioned in terms of closet space, but not by much. This is particularly the case in my kitchen pantry closet, which, until recently, had become a sort of dumping ground for anything that wasn't clothes in our apartment. This was where paper towels rubbed shoulders with orphaned power cords and an old bundt pan served as a container for batteries and owner's manuals for phones we no longer used. Where sometimes I would go days before changing the empty water cooler bottle because we couldn't find it. Basically, if you can imagine shoving a whole Costco into a closet, this is what it would look like. It was a rugged and lawless place, sort of like the Deadwood of closets. It was impossible to find anything (or even touch anything, really) without setting off an avalanche of junk I didn't even know I had. The last straw was placed on this camel's back the day I realized that I couldn't get the doors to stay closed anymore. I literally could no longer hide my dirty secret from the world, and it was time I do something about it.
So, I did what any self-respecting person with a problem closet should do: I grabbed my husband's credit card and zipped over to my own personal mecca, The Container Store. Five hours, two carts, and one serious swipe of the AmEx later (just think of the points, honey!), I had everything I needed to transform my crazy closet into a haven of fastidiousness and order. Here are the products I ended up using to whip things into shape. Not only can I find and access everything easily, now, but I find I actually have more space, with plenty of room left for whatever falls out the next time I open one of my other closets.

1. Container Store Plastic Bins, $1.50- $10. These bins are super-durable and lightweight and they come in a million shapes and sizes. I used them to sort all my stuff- tablecloths got one, vacuum parts and accessories went into one, and bakeware into another. I used smaller ones for things like cupcake liners, batteries, and taper candles.
2. The Grook Utility hanger, $20, from the Container Store. This hanger attached to the back of the door and holds the mop, broom, duster and pan, as well as smaller things we use all the time, like Skip's leashes.
3. P-Touch label maker, $49, from Staples. I love this thing so much I would let it sleep in the bed with us. You should seriously get one - all that organizing is only useful if you know where to find everything when you're done.
4. Ironing Board and Iron Hanger, $10, from the Container Store. Gone are the days when the ironing board would open up and fall on me when I opened the closet! No longer will I ever have to listen to my husband say, "Where's the iron?," because he was too afraid to go into the closet himself. Now it's just like at a fancy hotel. Or the Motel 6.
5. Wire shelving unit, $21, from Target. With all that stuff, I needed extra shelf space to keep it organized. I found this inexpensive unit at Target years ago, and finally put it to good use.
6. SimpleHuman grocery bag organizer, $10, from the Container Store. I mounted one of these suckers on the back of the door and it holds a ton of plastic grocery bags. We keep them to reuse, and now we can actually find them.
7. Scrapbook Cart, $59, from the Container Store. We removed the wheels from this thing, and use each one of the plastic compartments to hold all of our electronics and their accouterments. We sorted all the cords, memory cards, manuals, and chargers by type and purpose (and got rid of ones if we didn't know what they did). We call it the Box O' Technology.

Friday, February 5, 2010

Friday Styles: A Case in (Needle)Point

Most of the time, contributing to this blog is one of the high points of my day. It is my hobby and my great escape- when I'm doing the things I enjoy less (like unloading the dishwasher or picking up my dog's poo), I often let my mind wander and find myself daydreaming about what I want to write about next. I usually have a mental list a mile long of projects and ideas I can't wait to write about and share with you. But, for some reason, all the pleasure and joy I take in blogging goes out the window on Fridays, like a miracle in reverse. Maybe it's because I've already used up the week's best ideas, or because I am distracted and impatient to get the weekend started, but I find I end up with a massive, impenetrable writer's block on Friday. By Monday, that excitement and enthusiasm are always back in full force, but on Friday, I feel like I am running on fumes. "So, write Friday's post on Thursday!", my husband declares, as if I hadn't thought of that (and failed at it) already. So my latest solution to this problem is to start a new feature: Friday Styles. These posts will feature something that I own that I think is awesome, and that I think you should probably buy, too. That way, my reasoning goes, when I'm stuck, I can just look around my apartment until I spot something to write about. Hopefully, this will also help me rediscover all the great stuff I have stashed away in my place, and remember to be grateful for it. I hope you enjoy.

Custom Needlepoint Monogrammed Loafers, $158, from By Paige.
Okay, so I know I've shown these babies before, but it was almost a year ago, and I don't think I gave them the fanfare they deserve back then, so they are making an encore appearance today. These monogrammed needlepoint loafers were a gift from my husband, a man who never met a popped collar he didn't like (a.k.a. the reigning Preppiest Man Alive). While my own fashion choices are a little more eclectic, there is something wonderfully traditional, classic and pulled-together about the Brooks Brothers set, and I absolutely adore these shoes, from By Paige. Despite being personalized and handmade (you can choose everything from the pattern - think zebra- to the colors, to the font), I think they are very reasonably priced. And they are so comfortable, that I usually slip them on whenever I am just lounging around the apartment. I know they are a little over-the-top (that's sort of the point), but to keep them from going too "costume-y", I wear them with skinny jeans, a blazer, and chunky jewelry (as opposed to Lilly Pulitzer capris). The downside is that because they are custom, they can take up to 4 months to arrive- but at least you know that a classic like these will be in style (or not, depending on your perspective) forever.

Wednesday, February 3, 2010

What's the Schmata?

We tried. We really did. When we got Skipper, we were determined not to become those people who treat their dog like a child- talking to it in a baby voice, dressing it up in little clothes, and letting it up on the furniture like it owns the place. A dog is a dog, we averred.
But flash-forward six months and, well, I need someone to talk to during the day, and she gets cold and shivery without her puffy jacket on her walk. We held out the longest on letting her up on the furniture, not wanting to deal with the hair (and also because we saw the sidewalks where her paws had been- yuck). But, she's a little dog, so there's plenty of room for her between us on the couch, and it's so much easier to pet and cuddle with her when she's up with us, instead of having to get down on the ground at her level.
Luckily, before we totally caved, I talked to my friend, Randi, and she introduced me to the concept of the "couch schmata." Schmata, she explained, is a Yiddish word for a rag- in this case, a junky old blanket or sheet that you can throw over the couch before you let the dog up on it, protecting your slipcovers or upholstery from their claws and fur. We use an old cotton cable-knit blanket with a big hole in it. Most of the time we keep it hanging over the back of the couch (folded so the hole doesn't show), and pull it down when Skip hops up. We also spread it out on those not-so-rare occasions when we sit and eat dinner on the couch in front of the TV. When the blanket gets too gross or hairy, or when JM or I drop a tomato on it, I throw it right in the wash - so much better than washing the slipcovers.

Now, excuse me, I have to go take my doggy-woggy for her walkies.

Bag That Thing Up

So, about a year ago, I wrote a post about reusable shopping bags, and, at the time, I felt like that would be my final word on the subject. I thought I knew all there was to know, and that I really delved deep in my analysis. Looking back now, though, I can laugh at my own foolishness; my folly and my naivete. It's hard to believe that the girl who wrote that post is even the same person who writes this one. A lot of things happened in 2009 - just think, a year ago, Jon & Kate were still going strong, we'd never seen Lady Gaga wear this hat, and Snookie and The Situation were strangers to us. It's hard to imagine. And, personally, I've grown up a lot: I'm a little older, a little wiser... I became an aunt and a dog-parent, I endured a 26.2 painful miles in self-contemplation, I learned all the lyrics to the girl part of "Baby, It's Cold Outside" and how to wallpaper. Big stuff.
But, perhaps most importantly, I discovered these awesome reusable shopping bags from Flip & Tumble. The bags are huge, made out of washable ripstop nylon, can hold 25 lbs, have a strap that stays on your shoulder, and, like magic, they roll up into themselves to form a small (smaller than a peach) ball. I have stashed one in all my handbags, and even in some of my coat pockets, so I always have one with me. And, as a result, I find myself using them every single day. And they're cheap (okay, not cheap, but reasonable)! Just $9, or $8, if you buy three or more (which you should, because they're awesome). Who knows what 2010 holds in store for us, but whatever it is, I know one thing: It's in the bag.

Tuesday, February 2, 2010

Humble Pie

On cold nights like we've been having lately, I always get the urge to cook hearty, filling, meaty dinners - things you might order (along with a few pints) in an ancient pub on a drizzly London afternoon (I'm trying to paint a picture for you here). You know what I mean- foods like meatloaf, or stew, or beef Wellington. Sadly, the Brits aren't really known for their "health food," and if I actually ate that way every day, I would find myself with a right-large arse, mates (sorry- just getting in the spirit of things).
Happily, in the January issue of Martha Stewart Living, there are some ideas for healthier versions of some traditional comfort foods, and among them was a gem of a recipe for one of my all-time favorites- Shepherd's Pie (made with ground turkey instead of beef or lamb!). After going mental and exclaiming, "Blimey! This is bloody brilliant!," I set to making it for dinner. I halved it (the original serves 8) and I couldn't resist the urge to tweak the recipe a little bit, adding back just a few of the unhealthy elements (butter, please), to satisfy my own hankerings. Here is what I ended up with - It will make your flat smell heavenly, blokes will queue up to eat it, and I promise very little of it will end up in the rubbish bin. Tops!

Healthier Turkey Shepherd's Pie

You Will Need:
2-1/2 lbs potatoes (like russets), peeled and cut into 1-inch chunks
1/2 cup plain fat-free yogurt
1/4 cup skim or low-fat milk
3 tablespoons butter
1 tablespoon olive oil
1 small onion, chopped
2 celery stalks, chopped
1 carrot, chopped
1 garlic clove, minced
1 lb lean ground turkey
1/2 teaspoon chili powder
4 teaspoons cornstarch
3/4 cup frozen peas

What You Do:
1. Preheat oven to 425 degrees. Make the topping: Place potatoes in a medium saucepan, cover with water by 2 inches, and bring to a simmer. Cook until tender, about 20 minutes. Drain, reserving 1 cup cooking liquid, and mash potatoes (if you don't have a masher, and whisk will do in a pinch), with yogurt, milk, and butter. Add salt and pepper to taste.
2. Make the filling: Heat the oil in a medium skillet over medium heat. Cook onion, celery, carrots and garlic, stirring often, until tender 10-12 minutes.
3. Add turkey and cook, breaking up large pieces, for 5 minutes. Stir in chili powder and season with salt and pepper. Stir cornstarch into cooking liquid, and add to turkey mixture. Boil for 1 minute. Stir in peas. Transfer mixture to a 1-quart baking dish and top with mashed potatoes. Bake until bubbling and top is browned, about 3o minutes.

Monday, February 1, 2010

A Living Hall

I spend most of my time on this blog talking about the little day-to-day things I do around here just to make sure we have food to eat and clean clothes, and that we don't step on sharp or squishy things on our way to the bathroom in the middle of the night. And, trust me, there's enough of that kind of chores to keep me plenty busy every day. But along the way, I am also in the process of tackling bigger projects while fixing up and decorating our apartment. Some things I save up to pay experts to do (like refinishing our wood floors - not that I think I couldn't do it myself, I'm just pretty sure I wouldn't want to), but others I research and tackle myself. Okay, and sometimes I make my mom help me when she thinks she's just coming for a fun visit, as is the case with the facelift we gave our entrance hall this fall (better than Heidi 
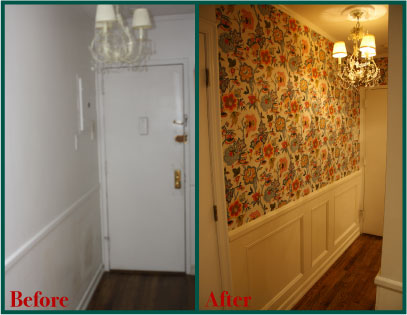
Montag's, I contend). There are a lot of wonderful details in our prewar walk-up apartment that make it feel special and distinct. Sadly, our entrance hall was not one of them. It was boring, bland and white, with (before I installed the chandelier) ugly recessed lighting, and a big, ugly electrical box that stuck out like a sore thumb.
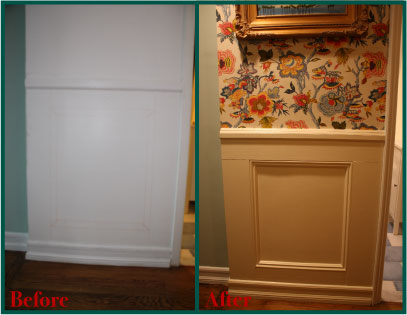
Once you made your way past the hallway, you were able to see the loveliness within, but, I was always a little disappointed in the dreary first impression the hallway gave. To liven it up, give the hall its own identity, and take advantage of the tall ceilings, I decided to add wainscoting on the lower part of the walls, and a bright, peppy wallpaper above it. After a lot of nail-biting, and navel-gazing, and hemming and hawing, and inner-contemplation, vacillation and dithering, I finally settled on a paper, with which I am unequivocally pleased. (The wallpaper is Favenay Cream from Pierre Deux. I painted the wainscoting Benjamin Moore Navajo White in Semi-Gloss to match the background of the paper). The results were better than I had imagined, and, as an added bonus, the vibrant pattern on the wallpaper works as virtual camouflage for the electrical box. Here are the simple steps to get this same look for your apartment or house - you will need some basic tools (even if you have to buy them, it will still cost way less than paying someone to do this for you) and carpentry skills (which you can learn by doing), and one free weekend (or, maybe less, if you are able to rope your mom into the project).

You Will Need:
Tools:
measuring tape
chalk
stud finder
hammer
finish nails
nail sinker
drill
wood screws
handsaw and miter box
jigsaw (optional, but helpful)
level
Spackle

Lumber: (quantity of all lumber will depend on the size of the area you are covering):
1" x 6" or 1" x 8" boards
Baseboard molding (click on links for examples, if you don't know what I'm talking about)
Chair-rail molding
5/8- 3/4" decorative molding


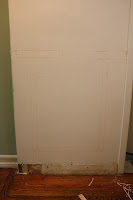
Step 1: Remove any molding that is currently on the wall (I use a hammer and a flat-head screwdriver driven between the molding and the wall- it'll pop right off). Use your measuring tape and chalk to arrange the dimensions of the molding, until you are happy with it (Just remember that a 1x6 is actually only 5-1/2 inches wide, and a 1x8 is only 7 -1/4 inches wide).


Step 2: Measure and cut a length of 1x6 exactly the length of your wall (remember- measure twice, cut once!) Use the stud finder to find the studs in the wall, and attach the piece of 1x6 to the wall using your drill and wood screws, driven into the stud at the top of where you want your wainscoting to be. Make sure it is level. Do the same with the side and bottom pieces. Make sure you sand the ends of your cuts so they meet up as smoothly as possible.


Step 3: Cut a piece of chair rail the width of the wall, and attach it to the very top of the front of the 1x6 frame. Measure a piece of the floorboard, and do the same. Measure and cut the decorative molding to fit the interior of the 1x6 frame. Use the miter box to cut the ends at 45 degree angles, so the four pieces fit inside at right angles. Nail these in with finishing nails and use the nail sinker to sink the nails into the wood. Don't worry if everything doesn't line up perfect-perfect- that's what the Spackle is for. Use it now to fill in any gaps and all the nail holes- this is a good job for Mom. Paint all of the molding with a primer.


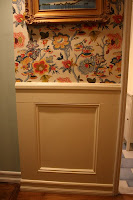
Step 4: Be sure to paint the wainscoting completely before wallpapering the upper portion of the wall, so you don't have to worry about getting paint on it. I'll do another post about how to wallpaper, but this should keep you and your mom busy for a while.