Showing posts with label cookin' tips. Show all posts

Monday, February 28, 2011

Mise, Please

In the past few years as a housewife, I think I have grown to become a pretty competent little home cook. I can chop like a champ, whip like a whiz, and  puree like a pro. The one thing that took the longest to master, though, and that I still mess up every now and then, is timing everything so that it all is finished at the same time. Inevitably, the salmon sits out getting cold or, worse, overcooked, while I wait for the potatoes to bake through.
One strategy I have learned to combat this, is using the technique of mise en place. "Mise en place" is french for "put in place" and refers to "having all the ingredients necessary for a dish prepared and ready to combine up to the point of cooking" (thanks, Epicurious). Like in a cooking show, when the host has everything all chopped and measured in little bowls in front of them, and all they have to do is throw them together. Haven't you always wished you could cook like that? Well, you can!

When you are cooking dinner, even just for yourself, don't just flip on the stove and dive right in. Slow down, take stock of what you'll need, and get everything organized in front of you, so it's all easily reached and ready to go at just the right moment. Dice the herbs, slice the veggies, and measure all the spices into a bowl. Because I work from home, sometimes I will chop the onions or slice the carrots in the middle of the day, and cover and set them aside for dinner. If you invest in a set of small dishes, like these  Pyrex containers with lids, $14, from Amazon.com, you can take things right from the fridge to the stove. You can even lay out the pots and pans you will be using. It may seem like this will produce an unnecessary number of extra dishes, but if you are smart, and combine ingredients that can be added at the same time, and reuse bowls, you'll be surprised at how much work it saves you in the long run. I keep a small bowl of chopped parsley in my fridge at all times- I pull it out and use it over the course of a week, saving myself precious herb-chopping time every week.

You'll be amazed at how much more fun cooking is when you aren't scrambling to mince the garlic before the sauce burns on the stove- you will truly feel like the star of your own cooking show. It's up to you whether you want to narrate your actions into an imaginary camera as you go, like I do. Bam!


Top photo: Ranger Mike Designs

Monday, November 15, 2010

The Perfect Blend

New York City is both the best and worst place to live if you are a food lover. On the one hand, there are an endless number of incredible restaurants and gourmet shops, plenty of people to enjoy them with, and even the most obscure ingredients can be found all year round. On the other hand, if you want to use those ingredients, chances are you will be doing so in a kitchen the size of breadbox. Wait, a shoebox. No, a matchbox. 
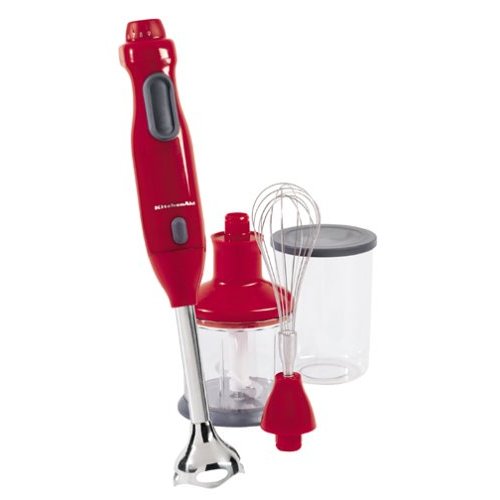
Because I suffer from tinykitchenitis myself,  I am always on the hunt for kitchen tools that work well for a lot of purposes and don't take up too much space (I love you, citrus juicer, but you have six parts, take up a whole shelf and only do one thing). That's why I have a special (very compact) place in my heart and kitchen cabinet - same thing, really-  for my stick blender. I have the Kitchenaid KHB300 model, $89 at Amazon.com, but there are other good ones out there for as little as $20.
This little sucker has essentially replaced my blender, Cuisinart and hand mixer, and takes up less space than any of them. It's basically the Optimus Prime of kitchen appliances...in that it's a transformer (get it?) The blender blade can do anything a traditional blender can do, only it does it right in the pot/bowl/pitcher, so you end up with fewer dishes. Pureeing a huge batch of soup is a messy pain with a normal blender, but oh-so-easy with a stick blender. Pop on the food processing attachment and you can chop onions in a few seconds, without any mess. Need to whip up some mirangues for dessert? Pop on the whisk attachment and boom, you're in business. Then, the attachments go right into the dishwasher to clean, and then stow away in no space when you're done.  If it sounds like I am doing an infomercial, it's because I actually feel like I am in an infomercial when I'm cooking with this thing.
So much functionality packed into such a tiny package... kind of like my kitchen.

Tuesday, October 19, 2010

Asparagus Tips

Get it? Because asparagus spears have tips and I am going to give you tips about asparagus. See what I did there?

Now, let me ask you this: Is there anything better than asparagus? Pungent urine notwithstanding, there is something so wonderful and fresh about this lovely veg. And it tastes so good with everything- you can throw it in a salad, an omelet or pasta, and it's obviously a great side, too. Technically it's in season in the spring, but it's widely available all year, which is good since we eat it at least once a week.

However, to really enjoy this awesomeness, you've got to know a little bit about how to choose and prepare it. Here are some tips for how to enjoy your asparagus to the fullest.

1. Look for straight, bright, crisp green stalks without any wilting, brown spots or wrinkling. Look for tips that are tightly formed, and dark green or purplish, with no soft or liquidy spots. If you still can't tell, take a whiff- it definitely shouldn't smell gross (or really much at all). Try to buy bunches with stalks that are roughly the same thickness- that way they will cook uniformly.

2. When you get the asparagus home, slightly trim the ends, and place upright in a stable container with an inch of water at the bottom (like  bouquet of flowers), and keep in the fridge until you are ready to use. I swear it will stay fresher longer this way!

3. To avoid cooking the woody stems, use this tip: Instead of cutting off the ends, hold the stalk of asparagus at both ends, and exert gentle pressure to snap the stock.  It will naturally break exactly where the tough internal fibers give way, leaving you with just the most delicious tender part.

4. Asparagus is delicious steamed or grilled, but my favorite thing to do is boil it (you'll know it's done when the stalks turn a uniformly grass-green color and you can insert a fork into the stalk without difficulty). Top with a little butter, parsley, and fresh grated lemon rind.  You won't want to eat anything else ever again.

Friday, October 1, 2010

Separate, but Equally Delicious

Here's a real quicky tip because it's Friday, and I know you're busy and trying to get things done before the weekend, and I'm busy, and really distracted thinking about bananas. Wait, what? You heard me- bananas, people. You know how, no matter what you do, you always seem to end up with one or two overly-ripe bananas at the end of the bunch? It's not really such a bad thing, because it gives you an excuse to make delicious banana bread (you can also freeze them for making smoothies later on), but it's kind of annoying how fast those nanners ripen, right under your nose. So here's a tip for delaying the speed at which those suckers turn brown and narsty: Separate them. You don't have to, like, put each banana in an opposite corner of the room, just keep them from being so snuggled together. Each banana gives off ethylene gas and enzymes which cause all the other ones to get riper faster.  If you break all the bananas apart at the stem when you get them home, you will delay the ripening process.

So, you want your bananas to stay just right for longer? You gotta keep 'em separated.

photo credit: ehow.com

Wednesday, September 29, 2010

Squash Your Fears

 One of the best things about fall is that, as the nights get cooler, a whole new world of delicious comfort foods, too heavy and warming for summer, opens up. And one of my personal faves of these foods is squash. Now, I know that some of you would put squash lower than "termite sandwich" on your Things I Want to Eat list, but I would argue that it's because you haven't given squash a fair shake. I mean, remember when I told you about Brussels sprouts, and you were like "Ewww", and then I was all, "Try them!" and you did and you were, like "OMG, yum!"? That was a great time. Let's do that again.
Squash, when properly prepared, has a delicious creamy texture, and a wonderful sweet flavor- like pumpkin pie, but you don't have to wait for dessert! It is also rich in vitamins A, C, and B6, as well as folate, fiber, potassium, beta-carotene, iron, and cancer-preventing phytonutrients- it's pretty much up there with the healthiest foods you can eat (which is good, because it sort of makes up for preparing it with butter and brown sugar, if you want to). Also, squashes are everywhere this time of year, and are typically pretty inexpensive, so they make a readily available and easily-prepared main dish (try filling the cavity with quinoa) or a side that tastes amazing with fish, chicken, turkey, shrimp...pretty much anything. My favorites are butternut (see the middle squash in the photo above), and acorn (the front squash, above), but you should also try spaghetti, kabocha, and ambercup squashes when you see them (click here for a list of squashes).

Here is my super-easy, fool-proof, delicious squash recipe. Try it- I guarantee you will love it.
And if you don't, I'll buy you a termite sandwich.


What you Do:

1. Preheat the oven to 375. Cut the squash in half, lengthwise, using a large sharp knife (don't try this with a little steak knife- you'll slip and cut yourself, and I don't want your blood on my hands). Scoop out the seeds and stringy squash gunk with a spoon, and discard.
2.  Place the squash halves, face up, on an aluminum-foil-lined rimmed baking pan. Spread each half with 1 tbsp butter (or olive oil), and a dash of cinnamon, salt, pepper, and drizzle with 1/2 cup orange juice (bottled is fine). Sprinkle on 1 tbsp of brown sugar or maple syrup, if desired.
3. Place squash in the oven, and bake for 1 hour, or until the meat of the squash is tender and soft.
4.Enjoy while you think about how right I always am.

photo credit: For the Love of Cooking Blog

Tuesday, September 21, 2010

Scramble For Dinner

For the last few months, JM and I have been in and out of town so much, that I haven't really had the time or inclination to shop and stock the fridge.  Which means two things: We ended up drinking a lot of tap water, and I found myself trying to scrape together dinners from whatever happened to be left in the fridge. I'm always up for a good culinary challenge, but there's only so much you can do with a couple shallots, frozen spinach and a chunk of goat cheese (for example). Happily, the most disparate elements can almost always be united with the help of one magical, delicious ingredient: the egg. I know I write a lot of posts about eggs, but that's because I write posts about my life, and I eat a lot of eggs in real life. And this is one eggy topic I haven't covered yet — the basic scramble. More forgiving than an omelet, faster than a fritatta, the scramble is the humble cousin of more complicated egg dishes. This is the sort of thing that anyone can cook — even people who can't cook — and have dinner on the table in ten minutes.  And the best part is, you can throw in the kitchen sink from whatever is left in your fridge, and come up with surprisingly lovely combinations. Obviously, this isn't the sort of dinner you make when you have company coming over (unless it's me coming over — I'll be psyched), but when it's just you and your roommate/husband/girlfriend/dog/Glee rerun, there's nothing better. As a bonus, this meal is free... or only costs about $2 per serving (depending on how you look at it).

Here are some random ingredients that taste great in a scramble:
Vegetables: Tomatoes, Onions, Shallots, Zucchini, Garlic, Bell Peppers, Spinach, Mushrooms, Leeks.
Meat: Sausage, Ham, Smoked Salmon, or Bacon.
Herbs: Parsley, Basil, Chives, Dill, Sage, Thyme, Oregano

Cheese: Feta, Cheddar, Queso Blanco, Swiss, Goat cheese, Blue Cheese.


1. Chop up your vegetable and meat ingredients, and saute them in olive oil in a skillet, over medium heat, until cooked through.
2. In the meantime, break eggs into a bowl (I usually factor 2-4 per person, depending on how hungry my eaters are). Add chopped herbs, salt, and pepper to taste.  Stir briskly to combine with a whisk (or a fork). Pour eggs directly into the skillet with the other ingredients.
3. Allow the eggs to set for a few seconds, then use a wooden spoon to pull the cooked eggs off the bottom of the pan, and allow the raw eggs to take their place. (Ergo, "scramble").
4. When eggs are cooked through, sprinkle on grated cheese, (and more herbs, if desired) and divide onto plates,  serving with toast and/or a green salad... if you happen to have them around.

Photo Credit: Bon Appetit

Thursday, July 1, 2010

Amazing Glazing

I'm a cheater.  No, I don't copy off other people's tests, lie about my age, or have clandestine affairs behind my husband's back (although, if you are reading this, Mark Ruffalo, for you I will make an exception). What I mean is, I act like I'm this fancy cook who spends all my days bedecked in aprons and oven mitts, and can think of no better way to spend my time than whipping up pie crusts from scratch, but in reality, when I cook, I like to find the easiest recipes, and use every shortcut I can.  Some of my favorite things are pre-shredded cheese, frozen puff pastry,  and limeade concentrate. I figure if I sprinkled it, stirred it or put it in the oven, I still get to say I "made" it.  And also, I try to stick to a very healthy diet (and am mostly successful at it) but I will always cheat on a health regimen for something delicious.  I can't help it- life is too short to pass up deliciousness.

So what's my dream come true? When Amber, who is a frequent Charmed Wife Contributor  (and is also a "Charmed Friend Since Preschool", and a "Charmed Bridesmaid in My Wedding") sends me a text message photo of the most incredible looking salad made with a secret cheater ingredient: Balsamic Glaze. It's a sweet, tangy, sauce that you can drizzle over salad, meat, veggies, or fish to add a tasty layer of flavor.  It's healthy, it's easy, and it's freaking delicious, and it's available at almost every grocery store.  Now that's something I can be faithful to.


Amber's Healthy Salad with Balsamic Glaze
Combine in a bowl:
Mixes baby greens
Avocado
Tomato
Shelled walnuts
Crumbled Goat Cheese
Strawberries (If you want to be fancy)

Drizzle with:
Flax Seed or Olive Oil
Balsamic Glaze

Yum yum yum.

Photos are from Amber. Yeah, I even cheated on writing this post. So sue me.

Friday, June 25, 2010

That's Cold

 On mornings like we have been having in New York this week (namely hot, muggy, sticky ones, where taking my dog around the block at 8:30am makes me feel like I took a dip in a swimming pool filled with sweat), I wake up jonesing for iced coffee. And like any true addict, I am in a total fog and can think of little else until I get my fix. Nothing works quite as well to simultaneously cut the heat and break me out of my dazed lethargy as a chilled cuppa joe.

But here's where I go on my Jerry Seinfeld-style rant. Have you ever noticed that iced coffee costs more than hot coffee, but you get less of it? And if you try to savor it and make it last at all, the ice melts, and leaves it watery and unappetizing. What's up with that?

Recently, as I disappointedly poked my straw between cubes in order to slurp up the last remaining droplets of precious coffee, I had an epiphany the likes of which a person can only expect a few times in one's lifetime. And it was this: What if the ice cubes were made out of coffee?  I know- it sends chills up your spine, right? Your drink would never get watery, and when the ice melted, you would just have MORE iced coffee. (Note to Starbucks: I am available for a high-paying consulting job.) Simply make yourself a double batch of coffee, mix it up just how you like it (with the soy milk and the Splenda, and whatnot), and then pour half of it into an ice tray and freeze it for tomorrow.

Furthermore, this idea is applicable to other beverages as well! Imagine: Arnold Palmer cubes.  Or olive juice cubes that make your dirty martini dirtier as the night wears on. The possibilities are limitless.

Obviously, I've already had my coffee this morning. 

photo credit: www.thesunblog.com

Friday, June 4, 2010

Just Peachy

Well, I took a trip to the grocery store today and imagine my delight when I saw the first lovely looking peaches of the season! Don't get me wrong, there have been sad, greenish fuzzy rocks in stock for weeks that the store has been trying to pass off as peaches, but these were the first of the real deal. When you grow up in Southern California, like I did, you can't help but become a bit of a fruit connoisseur  connoisseuse snob. And I wait all winter for the triumphant return of my favorite summery stone fruits.

But for those not born into the orchard, sometimes it can be hard to tell when fruits, especially stone fruits, are ripe. That's where I come in. Here's are some easy guidelines for how to choose ripe and delicious peaches, nectarines, apricots, and plums every time. So you will never again have to waste your money on stone fruits that taste more like, well, stones.

Look: Ripe peaches and nectarines should have a pretty pink and yellow surface (plums should be red and/or purple, and apricots should be, uh, apricot). There should be no green or brown spots anywhere.

Feel:Without pressing too hard and creating bruises, gently squeeze the fruit with your whole hand (not just pressing in your thumb).  The fruit should feel firm, but not hard, and should give just a little under light pressure. There should be no soft or liquidy spots anywhere.

Sniff:  Hold the fruit up to your nose and take a whiff. With all stone fruits, there should be a soft, distinct, fruity aroma. If you don't smell anything, it's a dud- put the fruit down and slowly back away from the produce section.

Follow these rules, and every produce shopping experience will be peachy keen.

Note: Upon reading this post, my husband asked "Wait, what are stone fruits?" I gasped, but then remembered that the poor boy grew up in the Northeast, where the winters are harsh, the soil is rocky and most of the produce is imported. So if you are similarly disadvantaged, stone fruits are all fruits that have pits- peaches, plums, nectarines and apricots. And cherries, actually, which come from Michigan, the other place I grew up. So, yeah, I know me some stone fruit.

Monday, May 10, 2010

Egg-cellent Advice

I love eggs. From my head down to my legs. And, also, my stomach. I like them every single way there is to cook them- poached, hard-boiled, scrambled, sunny-side-up, in an omelet, and soft-boiled in one of these cute little egg cups, which everyone should have. ("But, Lil, I don't have space for things that useless!", you might be thinking, but actually, in addition to being cute and not taking up much space at all, they are quite useful, if you think outside the ovoid - ours double as salt cellars, mini bud-vases and shot glasses, since I got rid of most of our college-era drinking paraphernalia in our last move). But I digress.
The only bad thing I can say about eggs is that I frequently buy them, and hard-boil a whole dozen of them to keep in my fridge for easy lunches or snacks (Did I mention I love eggs? It's kind of a miracle  my cholesterol isn't at Lipitor levels), and then I buy more just because I'm at the grocery store, and before I know it, I have five dozen eggs in my fridge, and I can't remember which ones are cooked, which ones are raw, and which ones are old and stale (and if you've ever had an encounter with a truly rotten egg, it's not something you want to line up to do again- but even a moldy, stenchy shell full of slime couldn't deter my unwavering affection for eggs). Let's just say, I put all my eggs in one refrigerator.
Here are two tricks I use all the time to tell my eggs apart.


Old Eggs vs. New Eggs

If you can't tell if an egg is fresh, put it in a bowl of water. A fresh egg will sink to the bottom. An egg that sort of stands up on one end, but stays underwater is still safe to eat, but if it bobs to the surface it's old and should be discarded (this is because eggs take on air as they age). It's the easiest way to tell which eggs came first.


Raw Eggs vs. Hard-Boiled Eggs

If you don't remember if an egg is hard-boiled or fresh, spin it on it's end on a flat surface.  A fresh egg will wobble, because the yolk is moving around on the inside, while a boiled egg will spin smoothly, because the yolk is fixed.

Use these tricks, and you'll never end up with egg on your face. Unless you want to.

Thursday, March 18, 2010

Open Season

Unless you are under 21 years old, have never worked in food services, don't drink, AND have no family members or friends who drink, you have no excuse for not knowing how to properly open a bottle of wine. Yet, all the time, I watch otherwise-sophisticated people struggle and flail around with a bottle, straining like they are attempting to pull Excalibur from the stone, ultimately spilling on themselves or leaving little pieces of cork floating in the wine in the process.  If this sounds like you, and you wonder what others think of you during this process, let me answer that for you: We are silently judging you, and thinking that next time we will bring beer, instead.  Let's get your technique straightened out, shall we? Once you master these simple strategies, you'll find opening a bottle of wine can be almost as pleasurable as drinking one.

1. Get a decent corkscrew. There are thousands on the market, but I favor the manual kind waiters use (see pic)- they are easy to use and work well, but don't completely remove you from the process. Ours is this one (a little pricey- it was a wedding gift). Don't totally cheap out- you get what you pay for with corkscrews, as with everything else in life, but you can get great ones at any cooking store in the $30-40 range.

2. Use the blade on the side of the wine key to cut the foil from the top.  Usually there is a rim on the neck of the bottle- just place the blade right above that, and twist your hand and the bottle, using your thumb for pressure. Pull the little foil cap off.


3. Insert the screw into the cork by twisting it in, while very gently pushing down (don't push too hard or you'll push the cork into the bottle). The key here is to try to make sure you center the screw above the cork before inserting it, and that you screw straight down, not at a wonky angle.


4. When the screw is completely inserted into the cork, tilt the wine key up and place the metal lever on the lip of the bottle. If this is difficult, try unscrewing the corkscrew one turn.


5. While holding the lever and bottle steady, simply lift the handle upwards, which will leverage the cork right out of the bottle. This shouldn't require much effort at all, and the cork will usually come out with a satisfying "pop."


6. Voila!

Wednesday, March 17, 2010

Soda Damn Good: 7 Unexpected Uses for Baking Soda

In this topsy-turvy world, one thing you can count on is that there will always be scores of new cleaning and beauty products released to the market each year.  And most of those are overpriced and so full of chemicals and additives that they are secretly poisoning you and the environment while they do their job (which is fine if they actually work - I mean, I'll do just about anything for very white sheets). But, meanwhile, little did you know that there is a completely non-toxic, inexpensive cleaning and beauty product that has been in the market for years, and that you probably already have in your pantry: Baking Soda.  Your grandparents knew that there isn't much this miracle powder can't do around the house (but somehow they forget to pass that info on to you). Here's just a sampling of what it's good for- it's versatility will blow your mind. Oh, and it's good for baking stuff, too.


7 Unexpected Uses for Baking Soda

1. Smell You Later: For some scientific reason I don't entirely understand, baking soda absorbs odors. I explored it's incredible ability to de-stinkify my husband's boat shoes in a post last summer, and it also works to keep your fridge and freezer from smelling too foody (just open the lid of a box and place it on the shelf), can make your pet smell more bearable (just sprinkle it directly on them and brush it through their fur). Or use it to deoderize your garbage can, gym bag, or laundry hamper (just sprinkle directly in there, and wipe out a few hours later), or throw a layer down onto your rugs (then vacuum it up) to make them fresher. Basically, if something stinks, the answer is baking soda.

2. Don't Get Burned: When you accidentally overcook something, and it leaves a burnt-on crusty residue on your pans, you can either spend hours developing carpel tunnel syndrome scouring it off by hand, or you can leave the job to your new friend, baking soda. Simply sprinkle baking soda on the pan, fill it with water, put it on the stove and bring to a boil. The gunk will come right off. This method also works for the rack on your grill (no need to boil, just soak overnight). How does it work? I don't know! Stop questioning the baking soda!

3. Silver Metal: Baking soda works as a gentle silver polish, too. Just mix six tablespoons of baking soda with two tablespoons of water to form a paste. Rub the paste onto the silver with a soft rag, and then rinse. Oooh, shiny!

4. I Feel Pretty: If your hair feels weighed-down with product or artificial color, add a few tablespoons of baking soda to your shampoo to revitalize it. You can also pat some under your arms as a deodorant, use it as toothpaste, use it as a facial scrub, add it to your bathwater to soften your skin, or mix it with water and use it as a mouthwash.  Who knew one product could look so good?

5. The Best Medicine: Would you believe me if I told you baking soda can also work medicinally to cure what ails you? Well, it can. Mix a teaspoon of baking soda with water and drink it to relieve heartburn or indigestion, or make a paste with water and rub it on burns and bug bites to take out the sting or the itch. It will also dry out rashes from diapers or poison oak or ivy.

6. You're Fired. I know what you're thinking- "What else can baking soda do for me?" Don't worry, I'm going to tell you. You can use baking soda to put out small fires from grease, ashes, or candles. Just dump the powder on the flames to extinguish them (using water or trying to smother the fire with a towel might spread the flames).

7. Arrest Pests: Despite how awesome it is, not everyone likes baking soda. Sprinkle it on your window sills or near door jams to repel ants and other bugs. Sprinkle it around your garden plants to repel rabbits and other animals from eating them. Amazing!

Tuesday, March 2, 2010

A Shear Thing

I love a good kitchen gadget- give me an apple peeler-corer, or an egg slicer or a whipped cream maker and I'll be entertained for hours. But the truth is that you don't ever really NEED any of those things, and you can get almost any cooking task accomplished, as long as you have a few solid and high-quality basics: a chef's knife, a paring knife, a serrated knife, and a good pair of kitchen shears. And (arguably) the greatest of these is shears.
You can use a sharp pair of scissors to do almost everything in the kitchen- butcher a chicken, mince herbs, snip the ends off green beans, cut parchment paper or twine, open packages, or `even cut wire or trim flower stems in a pinch (just don't tell my mom I do that). The trick is to get a good-quality stainless steel pair that come apart, so you can throw them in the dishwasher after every use without fear of rust, and sharpen the blades just like knives when they get dull from cutting wire (even though your mom told you not to). I also like pairs with non-slip handles (for when your hands are covered in chicken goo) and built-in bottle openers, for enjoying a tall frosty one when you're done. Here are three worthy pairs. Owning any of them would be shear luck.

Top left, Titanium kitchen shears, $13.50, from Williams-Sonoma; Right, Wusthof come-apart shears, $19.95 from Amazon.com; Bottom left, Shun Classic 'Taskmaster' shears, $39.95 from Sur La Table.

Thursday, February 18, 2010

Crustacean Adoration

I love to cook dinner for my husband, but I'm always trying to strike that balance between keeping it economical (otherwise, why not just order in?), keeping it healthy, and keeping it interesting. But in the two and a half years that we've been married, I have started to feel like I'm running low on options: We both try to limit the red meat we eat, fish gets expensive (and smelly), and I've cooked so much chicken, it's a wonder we both haven't sprouted feathers. But the other day in the grocery store's frozen section, I stumbled upon a brand new idea that really has legs: bags of frozen shrimp.
Don't ever waste your money on the "fresh" shrimp at the seafood counter- as a matter of practice, all shrimp are flash frozen, (they have just pre-thawed them) so this is one case in which buying frozen is the right move. A bag of frozen shrimp is about $10-15 at the store, which may seem pricey, but there are enough shrimp in there for 4 to 5 meals for two (taking you down to, like, $3/meal). And since you can cook the shrimp from frozen, you can quickly and easily just grab the amount of shrimp you want, reseal the bag, and put the rest back in the freezer.
There are at least a hundred delicious meals you can make with your shrimp (not to mention my favorite old-school appetizer of all time, shrimp cocktail). Here are just a few of the dinners I have gotten out of one bag of shrimp, but this versatile and delicious crustacean goes well on just about anything- the sky's the limit. Or maybe the bottom of the ocean is the limit. Whatever.

Shrimp Scampi: Quickly boil and peel your shrimp, then saute them with butter, minced garlic, lemon juice and white wine. Serve over pasta or rice, and top with Parmesan cheese. Shrimp Tacos: Boil and peel shrimp according to package directions. Serve in warm tortillas with cheese, black beans, shredded cabbage, and pineapple salsa. Shrimp Cobb Salad: Cook shrimp according to package. Serve on top of greens with hard-boiled eggs, avocado, tomato, blue cheese and bacon (if you like). Top with vinaigrette. Shrimp Rolls: Boil and peel the shrimp, and then run under cold water until cooled. Cut up the shrimp to small pieces, and combine with minced red onion, celery, parsley and mayonnaise. Serve on toasted and buttered hot dog buns.

Uh-oh, I think I might be growing an exoskeleton.

photo credit: myrecipes.com

Wednesday, February 17, 2010

Super Bowl

Here's another very useful little tip I picked up during my brief stint in cooking school. You may have noticed that I don't have a lot of good habits in the kitchen, so when I actually do something properly, I like to brag about it. Kind of like when I wear socks that actually match, and I insist on pulling up my pant legs to show them to my husband and go, "What do you think? Nice, right?"

While preparing a meal, I always place a big mixing bowl next to my cutting board into which I dump the wrappers, onion skins, and veggie scraps that I discard during cooking. Even though there is a garbage can right in my kitchen island, it really saves a surprising amount of time and effort using the bowl, instead (plus, I don't have to touch the cabinet door with tomato juice or nasty chicken goo on my hands). I also like being able to peel things over the bowl, which keeps my cutting boards and counter tops cleaner while I cook. This is pretty standard practice in restaurant kitchens, where they really have to be efficient and organized.

I have since learned that Rachel Ray does this on her show, as well, and even sells a special "garbage bowl" in her product line on QVC. But let me assure you about two things I know for sure: She was not the inventor of this idea - some genius cooking Frenchman was, many many, years ago. And pretty much any old bowl will do- you don't need to start watching television home shopping channels to get in on this action (although I would stick to metal, glass or ceramic- plastic can get scratches that trap bacteria). Just use something you've already got, and remember to throw it in the dishwasher afterward. Try it- it may just bowl you over.

Wednesday, January 27, 2010

Mango-A-Go-Go

Consider the case of the poor mango. They're absolutely delicious- a little sweet, a little tart- with a soft, creamy texture. They're chock-a-block full of antioxidants, iron, and Vitamin A. They're available most of the year (starting right around now), and the flavor is like an instantaneous mini-vacation to some balmy island. Yet, they just aren't as widely eaten and liked as they should be. Why? Because, unlike the ever-portable apple, or the comes-in-a-convenient-wrapper-with-a-handle banana, mangoes are very very difficult to eat. They've got a long, flat pit right in the middle to which the flesh clings tenaciously, and, if you get a good one, you are almost guaranteed to end up with sticky orange goo on your chin (and maybe your shirt and shoes, too).
I remember very clearly seeing a small local child eating a mango, on some Spring Break trip I took somewhere tropical one time (okay, maybe I don't remember that clearly). The kid, who was barely old enough to be out of diapers (well, definitely less than ten years old), methodically and perfectly peeled and ate this mango without getting a drop of juice or pulp on his (or her) hands (maybe this happened in a dream, actually...) Anyway, the point is, I knew then and there that eating a mango didn't have to be a sloppy, sticky mess, if only I figured out the proper method.
So here it is- the "right" way to eat a mango. Unlike the tropical-dream-child's method, my method requires a knife and a cutting board, but the results are the same: All the lovely pleasures of the mango with none of the pulpy mess. Right here in reality.

1. Leaving the skin on, and holding the mango narrow-side up, use a knife to cut the flesh from one side of the mango. If you estimate about 1/3 of the width of the side, you should cut just to the side of the pit. Repeat on the other side of the pit, cutting off the other fleshy side.


2. Use the knife to score a grid into the flesh on each side. Try to cut deeply through the flesh, without cutting through the skin.


3. Push the skin side to invert the flesh, causing your mango chunks to spread away from the skin. Use the knife to cut the chunks free from the skin.


4. If you don't want to waste any of that mango goodness, use your knife to cut the remaining sides and bottom from the pit. Only about 3/4-inch of flesh is likely to come free from each side. Peel these slices and cut into chunks.


If you don't plan to gobble the whole mango immediately, put the chunks in a Tupperware container and refrigerate for up to 3 or 4 days, or pack in your lunch. Or, freeze the chunks for a delicious, nutritious, low-calorie treat.

Monday, December 28, 2009

Get A Grip

If you're doing a lot of cooking this holiday season, especially in someone else's kitchen,  chances are you are risking life and limb (well, at least digit) while chopping and dicing with a less-than-sharp knife on a slippy cutting board. I mean, honestly, you are practically begging for a bleeding wound. If you've listened to me at all, you know what I think about dull knives- and that's not much. It's easy (and kind of fun) to sharpen your knives (I'll show you how one of these days), and a sharp knife is much safer than a dull one.  But while you may not want to take on the task of sharpening your great-aunt's Miracle Blades, there is something simple you can do about that ridiculous cutting board. This is one of the most valuable lessons I picked up during my brief stint in culinary school (unlike whipping egg whites into meringue by hand, which is a total waste of time and energy in the age of hand mixers): dampen a paper towel or rag, lay it flat on the counter, and place the board on top. The towel will stick to both surfaces and keep the board from budging. 

This same trick works for anything that slips around- like my parents' orange juicer, which slips and slides all over the kitchen counter and nearly dislocates your wrist when you use it. But place a wet paper towel or rag underneath it, and voila- juicing becomes less of a squeeze and more of a breeze. 

photo credit: startcooking.com

Wednesday, December 9, 2009

Thrift Shopping

I'm headed back to New York today, and, while I can't wait to get home and see JM, I will certainly miss how well taken care of I am when I am home visiting my parents. Instead of iced sparkling water delivered to me in the hot tub by my mom, I'll be back to self-poured tap by the kitchen sink. Instead of lovely meals prepared by other people, I will be back at my three-meal-a-day cooking regimen. And, most unappealing of all, instead of "placing an order" as my dad runs out the door to the store, I'll be back into my old daily grocery-store routine. Especially around the holidays, when the markets jack up their prices, grocery shopping can be a daunting and expensive venture, and is never my favorite part of the day. Far too often, I have ducked into the store to grab some chicken breasts for dinner, and left with twenty bags cutting off the circulation to my hands and a receipt longer than my arm and my leg (and costing as much). It's easy to justify these costs as things we "need", but truthfully, there is no reason a family of two needs to spend our future children's college tuition on groceries. Could we spend less? Aisle say!
Happily, I have developed a few strategies to help cut costs at the grocery store, and, in the spirit of holiday giving, I will share them with you. If I play my cards right, these little changes could add up to a big chunk of change. Hopefully one big enough to cover two plane tickets back here in January. Warm up the hot tub, mom!

Make a List: When I go to the grocery store with a list of the items I need written down, I end up spending about 50% of what I spend when I go in without one. It makes me feel like an idiot that I make this mistake again and again, but it is marginally comforting to know that statistics show that everyone else makes the same mistake over and over again, too. Don't be an idiot like me: Always make a list and stick to it.
Shop Around: I go to two different grocery stores- the nice one and the gross one. At the gross one, I buy everything that is packaged, boxed, canned or bottled, as well as laundry detergent and paper towels (personal goods like toothpaste and shampoo are always cheaper from the drug store). At the nice store, I buy fresh meats and produce, which are worth the splurge. But, I have noticed that the same brands of canned beans and jams are sometimes $2-4 more at the nice store than they are at the gross store. For savings like that, I can tolerate aisles that smell like ammonia and surly checkout girls.
Price Check: Always look at the cost per unit (CPU) price of packaged goods, which is usually printed on the shelf label beside the net price. Bigger containers aren't always cheaper than small ones, and sometimes there are surprising price discrepancies between two equally "good" brands. And consider store brands for basics, like flour or rice- you will never know the difference (but your credit card will).
Prep Your Own Produce: As I have mentioned before, it pays to avoid the pre-cut or packaged produce. By simply spending a few minutes after your shopping to wash lettuce and cut up fruit, you can save a ton of money, and end up with fresher food. That's what we in the business call a win-win, people.

Photo credit: rkgebbia.com

Tuesday, December 1, 2009

Dinner on a Dime

I'm finding it hard to get my head around the fact that Thanksgiving has already passed, and we are barreling headlong toward Christmas and the New Year. JM and I sat down last night to look at our calendars and we realized that between parties, holidays, visitors, and travel, we have hardly a free night between now and the next decade (get ready for the '10s!). And while we are looking forward to all of that with feverish enthusiasm, all of those things plus our holiday shopping have us feeling like there are dollar bills sprouting wings and flying out of our wallets.
So around this time of year, I start getting very resourceful about the meals we do eat at home. And I'm betting a lot of you could use a little resourceful yourselves right about now. Here are some strategies I use to make weeknight dinners quick, easy and very inexpensive (we're talking less than $5/ serving). So instead of just giving in and shelling out on take-out all season, take some of these tips and you can spend those spondulics on something a little more festive. Like tinsel. Or noisemakers. Or fruitcake.

Well, maybe not fruitcake.

Seven Cheap Supper Strategies

1. Double Duty: Instead of planning your meals one-by-one, think ahead, and you can often get several meals for the price of one. Roast a chicken for tonight's dinner, and, instead of allowing your husband to eat seconds, reserve half the meat to make a chicken pasta, salad, or soup for tomorrow night. You'll be amazed at how doing this can cut your labor and grocery bills in half.
2. Soup-endous: Make a big pot of soup this weekend (try black bean or a hearty veggie soup), and you'll have meals for the week, for pennies each. Double the recipe and freeze half, and you'll be set for next week, too! Sure, you might get sick of it by Friday, but think of the money you'll save!
3. Breakfast for Dinner: Instead of shelling out in the meat aisle every night, look to an unexpected source to get your nightly protein- eggs. Try a rustic Italian-style poached egg, or a cheese omelet with a salad for a meal that is faster than fast food, and healthier and cheaper, too.
4. Presto Pasta: Think you have nothing to eat in the house? Before you go blow your paycheck at the market, check your pantry again. If you've got pasta in there, you've got a cheap, easy dinner. To dress it, saute an onion with that leftover tomato sauce in the fridge, or mix whole wheat pasta with fresh herbs, butter, and lemon juice for a simple, delicious dinner. If you can root a meal out of your pantry, that's a dinner that is essentially free.
5. Kitchen Sink Salad: A lunch staple for me is what I call a "kitchen sink salad" or a "random effing salad", in which I take a bowl of greens and toss in anything in my kitchen that looks appealing. Dried cranberries from the cupboard? Sure. Hard-boiled eggs? Why not? Last night's leftover salmon? In it goes. Take it as an opportunity to clean out your fridge and make dinner at the same time. Top it with a little homemade vinaigrette, and you'll be in business. Is it effing random? Yes, but it's usually also pretty tasty.
6. Frozen Assets: When looking for dinner resources, don't forget about that other compartment in your fridge (you know, the colder one). I almost always keep a couple boxes of frozen peas or spinach in there (great pasta or add-ins), and sometimes I luck out and find a frozen burrito or pot pie. If you don't have those things at home, check out the freezer section of your market- you can usually find something inexpensive and tasty to eat in a pinch (and, as a bonus, you may be able to cook the whole meal in your microwave)!
7. Stay Late: When all else fails, consider this nefarious strategy for getting a free meal- stay late at work. Most employers are required to pay for dinner when workers stay past 8 p.m. If you are already stuck at your desk til 7, spend the extra hour doing some online gift shopping, and cash in on a free sandwich for your efforts. Sure, it's not exactly ethical, but I'm guessing it's not the first time you've wasted time at work. For instance, what are you doing right now?

photo credit: Martha Stewart

Monday, November 30, 2009

On the Sauce

Hello! I hope you all had a lovely holiday weekend. We sure did. I got to spend most of the weekend engaged in two of my favorite hobbies: cooking and eating.
For Thanksgiving dinner, I got the big-girl job of bringing the appetizers. I always am looking for an excuse to make my very favorite, the king of the appetizers: shrimp cocktail. I am mildly allergic to shellfish, but I love shrimp cocktail so much that I am willing to throw caution (and rationality) to the wind in order to eat just a few of these little suckers now and then. But there is such a thing as bad shrimp cocktail (and I don't just mean the kind that gives you food poisoning), when the shrimp are rubbery or the sauce is store-bought and overly sweet, and, in those cases, I am always sorely disappointed to have risked anaphylaxis. I have finally perfected my own recipe, and it is delicious and foolproof.

The trick with the shrimp is to buy the frozen uncooked easy-peel shell-on kind. The precooked ones always seem to end up rubbery or tough, and I find the shells help them cook evenly and taste fresh. All shrimp are frozen in the fishing process, so if you buy them unfrozen, you are just paying a premium for the grocery store to thaw them for you. And I insist on making my own sauce, which, while simple, makes all the difference between a mediocre cocktail and one that is worth risking hives over.

Shrimp Cocktail Sauce
1 cup ketchup
1/2 cup Heinz chili sauce
1 tablespoon horseradish (found in the refrigerator section)
1/2 teaspoon Worcestershire sauce
2 tablespoons fresh lemon juice
1/2 teaspoon Tabasco
1-2 cloves garlic, minced or pressed through a garlic press
1 tablespoon fresh cilantro, chopped

Combine all the ingredients in a bowl. Refrigerate for up to a week.

Cocktail Shrimp
Thaw the shrimp for about 10 minutes, by placing them in a colander under cold running water. Meanwhile, bring a large pot of water to a boil. Boil the shrimp for 3-5 minutes, until they are bright pink, and the flesh is no longer translucent. Meanwhile, rinse the colander thoroughly. When the shrimp are cooked, return them to the colander and run fresh, cold water over them, until they are cooled. Peel the shells off, leaving the tails attached. Serve with lemon wedges and cocktail sauce. Yumma!