Showing posts with label sewing. Show all posts

Wednesday, August 18, 2010

Let's Get This Straight

Sewing is one of the housewifey things that it seems like the domestically challenged have the hardest time wrapping their heads around. I'm not just talking about sewing on a button, or fixing a saggy hem (although those pose their own challenges to some folks), but actually taking fabric and making something out of it. The idea of it almost seems quaint, in an era when you can get a cute outfit at H&M or a full set of patio cushions from Ikea for less than the fabric it would cost to make them. Of course, they (both) will start to fall apart the first time you sit down, but still.
However, because my parents took a sort of Laura Ingalls Wilder approach to child-rearing, I actually like to sew. When I was an awkward preteen, my mom enrolled me in a sewing class which culminated in my being forced to model a pair of culottes of my own creation in a "fashion" show at the county fair. While it was among the most mortifying experiences in a lifetime full of mortifying experiences, the sewing know-how seemed to stick. While I don't have much of a desire to attempt to create my own skorts or palazzo pants these days, I still take a certain pride in my ability to make my own curtains, pillows, tablecloths, and baby quilts that don't cost a fortune, and have that handmade-with-love vibe to them.
All of this is has been a very long-winded (and cathartic) intro to the topic of one very simple sewing trick that might be the solution to a problem vexing the sewing-phobes among you- how to cut fabric straight. It's one my lanky, bespectacled (in retrospect, creepy) bachelor of a sewing teacher imparted to me, and one that has come in handy many times over the years. And does it work? You bet your culottes.

How to Cut Fabric Perfectly Straight

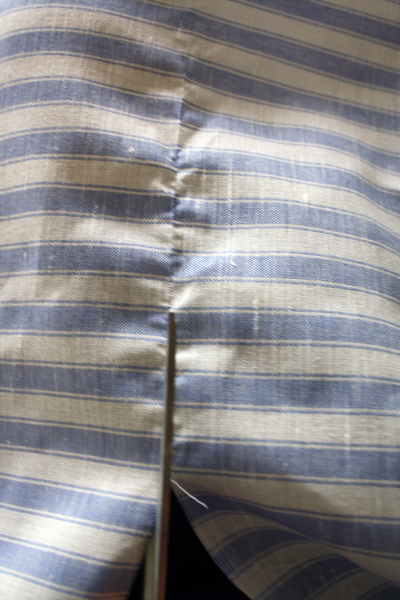
 Step 1: Cut a slit in the fabric about where you would like to cut the straight line. Pick at one edge of the fabric until a string comes loose that you can grab on to.
 Step 2. Yank on the string, causing a pull that runs the width of the fabric. Pull the thread until it breaks, or comes completely free of the fabric. The run you have made in the fabric will leave a perfect line in the weave of the fabric.
Step 3: Using your sharpest scissors, cut following along the line that the string left. Voila- a perfectly straight cut! Now, whatever your sewing-related traumas may be, wonky edges won't be among them.


top photo credit: blog.craftzine.com

Monday, July 19, 2010

Sew Smart

Last weekend, at my brother- and sister-in-laws' beautiful wedding reception, the dance floor was wildly, awesomely fun and crowded from practically the band's first note (particularly when the mother of the bride took to the stage to play the cowbell). In this merry fracas, however, some reveler (who shall remain unnamed) accidentally snagged an appendage on Ali's (the bride) gorgeous lace wedding gown, tearing a large hole in the cap sleeve, only midway through the evening.  Where, oh where, was the torn and tattered bride to turn? Well, if you have me for a sister-in-law, the answer should be obvious: to me and my bottomless bag of tricks. Did you really think I would agree to be a bridesmaid and not bring my trusty sewing kit? Oh, ye of little faith.
Okay, fine, I have no idea how to sew lace (I'm pretty sure most people in this country stopped learning "tatting" once the TV was invented). And after one (or three) too many celebratory drinks I probably would have poked lovely Ali twenty times with a needle had I given it a shot (speaking of shots...). But, luckily, I had my other secret weapon with me there, as well: My Mom. Quick as a bunny, she patched up Ali's dress good as new, without drawing blood, and sent her back to shake it on the dance floor before she missed another song. Sure, my mom is the real hero in this story, but the point is that her heroics were only made possible with the use of MY sewing kit. Which is why I am taking 50% credit.  Mama didn't raise no fool.
Here's how to make your own perfect on-the-go emergency sewing kit, to help you save the day (okay, and sometimes help you help save the day) wherever you go. Forget those pre-made sewing kits they give away in hotel rooms or sell in drugstores- the boxes are alway flimsy and break, and there is always a ton of stuff you don't need (A measuring tape! Purple thread! Tiny, dull scissors!) and not enough of the stuff you do. But feel free to poach the useful items from those kits. Get a little creative, get the essentials, and you'll be prepared for anything. Mama says.

What you will need:
An Altoids or other sturdy metal candy tin
or
A sturdy cardboard jewelry giftbox with a lid
A rubber band to hold closed

Put inside:
*Sharp scissors with rounded tips (so they won't get confiscated at the airport).
*1 bobbin each of black, white, and a mid-tone gray thread. One of these will work in almost every situation.
*Assorted sharp needles.
*A needle-threader (especially if you have poor eyesight or shaky hands).
*Assorted safety pins.
*Assorted straight pins.
*Assorted buttons.
*A seam-ripper.
*Toupee tape. (It's super sticky, and will fix anything from a droopy hem to a cleavage-revealing neckline).

Go forth and save the day. And call me if you need my mom.

photo credit: Craft stylish

Tuesday, May 11, 2010

Redress the Problem

About this time every year, I fold up all my sweaters and coats and store them under the bed, and I pull out all my cute summer dresses. Before I hang them in the closet I do a little fashion show in front of the full-length mirror (I usually leave out the model walk, unless JM is home), and make sure that I still like them and think I'll wear them again. Most of them stand up to the challenge, but some just... don't. In some cases, it's hard to believe that my sense of fashion has changed so much in the eight months since I put the dress away- I think, "Did September Me really think this was a good look?"

Take, for example, this flouncy aqua dress I bought a couple years ago. I really thought it was cute back then, but in the fresh light of 2010, it looked more "Little House on the Prairie" than "Sex and the City". It wasn't all bad- I still liked the color, the shape of the strapless top, and the high waistline - but the voluminous tiered skirt that ended mid-calf and was more fatering than flattering. Not good.

Could this dress be saved?  I figured it was worth a shot. Using a seam ripper, I removed the bottom tier of the dress, and then stitched the seam into a hem using a sewing machine. Easy! And you can do it with any dress (or even shorts) that fall at unflattering lengths. If your dress doesn't have tiers, you can measure an even hem by using a measuring tape, marking the dress with pencil at even intervals, and then cutting between the marks. Depending on the fabric and how often you intend to wear it, you may not even have to hem it- although, iron-on seam binding works miracles if you aren't inclined to sew.

You know what they say: Dressperate times...

Thursday, February 25, 2010

No Ifs, Ands or Buttons

Maybe we haven't known each other that long, but I like you, and I don't want to see you played for a fool. That's why I think it's imperative that you stop throwing your money away sending clothes to the tailor that you could easily fix yourself for free. You know who you are- your skirt gets a little droopy hem, or you pop a spaghetti strap on the dance floor, or, worst of all, a button falls off your fave cardy, and you immediately go running to the professionals.
All of these sewing tasks are totally simple and entirely doable by you as long as you have a very basic sewing kit and at least one finger and thumb. And each of them can be accomplished in the time it takes one American Idol contestant to butcher your favorite song (you might even be grateful for the distraction).
Luckily, I found this illustration on Esquire.com, and I figure if their readers are up to the task of rebuttoning themselves, so are mine. So I stole it, because I am not above theft when it comes to helping my friends. Don't worry, you can pay me back later.


Step 1. Thread your needle with a thread that matches the button (or whatever color has been used on the other buttons) Don't worry if the color is slightly off (i.e. navy vs. black)- no one will ever notice. Double the thread over and tie the ends together in a knot. Find the exact spot where the button should go by matching it up with the button hole. Insert the needle through the fabric from the back (so the knot doesn't show on the front), and stitch an "X" to anchor the button.

Step 2: Thread the needle through one of the holes in the button (if the button has 4 holes, take note of how the garment's other buttons are sewn on- do the stitches form an "X" or two parallel lines- you will want to copy it so this button matches). Then stitch up and down through the holes in the button and the fabric loosely at least 4 or 5 times, keeping the button pulled about 1/8 - 1/4" away from the fabric (you can insert a toothpick or matchstick to help you keep the right distance).

Step 3: When the button feels well affixed, thread the needle down through one of the holes in the button, but not through the fabric, so the thread is coming out from between the button and the fabric. Then wind the thread around the loose stitches several times (this creates a "shank" and leaves enough space for the button hole without putting pressure on the fabric).

Step 4. Insert the needle through the wound shank you have created a few times, securing the thread. Snip the loose thread near the shank with scissors so there are no loose ends. Ain't that a kick in the buttons?

Here's a bonus tip: Keep a glass jar with a lid (like a mustard or baby food jar) in your sewing kit. When a garment comes with extra buttons, add them to the jar. Pretty soon you'll have a large enough collection to replace almost any fastener that goes missing. Plus a jars of buttons make for pretty cute objets in my fantasy craft room.

Photo credit: Country Living
Illustration credit: Esquire.com