Showing posts with label decorating. Show all posts

Tuesday, December 7, 2010

Picture This

JM and I have lived in our "new" apartment for almost two and half years, now. In that time, I've painted every room, put up wallpaper and wood paneling, refinished the floors, and arranged and rearranged the furniture in every room at least twenty times. But, for some reason, we had not hung up hardly any of our artwork. We simply couldn't commit or agree on what should go where, so instead we left all our paintings and prints stacked in a corner of our kitchen, cluttering up our house as their frames got dinged and our walls stayed bare. It was madness, I tell you, madness. Finally, last weekend, we came to our collective senses, and decided that hanging artwork anywhere, even if it wasn't the perfectly right place, was better than the status quo of no artwork, nowhere.

One thing we agreed on was that our tiny guest room/office needed a serious artsy pick-me-up. But the room is so narrow, we were concerned that hanging anything on the main sidewalls would make it feel claustrophobic in there. The solution? Lots of pieces arranged on the smaller walls, all the way to the high ceiling (to emphasize the air up there).

Whenever you are hanging a bunch of artwork on one wall, it's important to play around with the arrangement to make sure it all fits together, and the proportions work in the space. A good way to do this, without committing to hammer and nail, is to cut out paper sheets the same size as each of your pieces of art. (We used newspaper, which works well, because it's readily available, free, and comes in big sheets. But if you go this route keep in mind you may have to Mr. Clean Magic Eraser some ink smudges off your walls when your done).  Make sure to label each paper with which piece it represents, and which way is "up"). Then, use masking or painter's tape (so your walls won't be damaged) to play around and arrange the paper pieces on your wall, until you are happy with the way they look and fit together.

Measure the length from the top of the frames to the hanging wires, and mark the distance on each sheet. Then you can simple hammer the hanging hook (I like this kind, $5.70 for 50 pieces, from Amazon.com) right through the paper, for perfect placement. Rip the paper away, throw the art up on the hooks, and voila! - perfectly spaced art. So much easier than rearranging the furniture.

Thursday, September 16, 2010

It's A Sign

In case you were wondering what I was up to during that lengthy period of time in August when I was not posting on the blog regularly, here's the answer: projects. Oh, sure, I did I certain amount of reading, suntanning and swimming (with the occasional wedding thrown in for good measure), but for the most part, when my mom and I get together, we end up doing projects. It's probably a good thing that we don't live in the same town because JM and my dad would forget what we look like without sawdust in our hair and paint on our faces. And this summer, one of our projects was creating signage. My family's lake cottage is in an old self-managed association where most things have a lovable, decaying, well-used quality to them. This year, we decided to class the place up a bit by replacing some of the more decomposed wooden signage that had been around since the (first) Roosevelt administration, and had become, essentially, unreadable. I like old signs as much as the next guy, but here's a tip: When you can't read them anymore, it's time to throw in the towel. But why hire a sign-maker, when you can easily make your own professional(ish)-looking painted signs yourself? With simple materials you can easily find, you can make signs for whatever your heart desires- house names, street numbers, "keep out- no boys allowed" for your treehouse- the possibilities are endless. Here are the easy-peasy steps we took to make our fancy new signs. And may they happily point the way and rot until my great-great-grandchildren replace them.


What you will need:
A piece of wood, cut to size
A computer print-out of what you want the sign to say, sized to fit
A piece of graphite transfer paper
Acrylic paint and a small flat-sided paintbrush
Varnish and a disposable sponge paintbrush

What you do:
  Step 1: Using your computer, print out the lettering for the sign in the size and font that you like (you may have to print it in several pieces and tape together, as I did). Place a piece of graphite transfer paper, graphite down, on your wooden board. Place the print-out on top, aligning how you like, and attaching it with tape to secure.
Step 2: Carefully trace the lettering on the print-out with a sharp pencil, pressing firmly. In case the photo at left has you perplexed, I do not have teeny-tiny hands- that is just an abnormally large pencil. For your purposes, any size pencil will do. Even a pen would probably be fine, come to think of it.
Step 3: Remove the print-out and graphite paper. I could have omitted this photo, and almost did, because it doesn't really illustrate anything and reveals that I messed up the placement of my graphite paper, and didn't transfer the top half of the word "courts". But I didn't because I wanted to show that everyone makes mistakes when doing projects, and it's no big thang- just fill in the tops of the letters freehand, and get on with it.Or, just place your graphite correctly in the first place.

Step 4: Using a thin paintbrush and your acrylic paint, carefully fill in over the lettering. The paint will cover the graphite. If you smudge, you will be able to wipe up the paint as long as it is still wet, so keep a rag at hand. Also, imperfections are part of the charm of homemade signs, so relax.


Step 5: Allow paint to dry completely. Cover entire piece of wood with varnish, and allow to dry until set. Hang or place your masterpiece and revel in your handiwork.

Friday, April 30, 2010

Stripper Lessons

Back in 2003 when I moved to New York, I was going through a real "Shabby Chic" phase where put linen slipcovers on all my furniture and painted everything white. Now that I'm a little older (ugh, where did those seven years go?), and have developed a more complex sense of style, it kills me to look at all that white paint and think of the pretty mahogany or oak hidden underneath it. So, slowly but surely, I am determined to remove as much of it as I can from the pretty antique pieces worth saving. I had been warned that stripping furniture is a messy, unpleasant and toxic job. To be clear, just breathing near these chemicals will likely take a few hours off your lifespan (just don't say I didn't tell you so when you're all light-headed afterward).  Ah, the price we pay for beauty. 

So, I decided to start small and strip a pretty mohogany mirror that my mom and I had picked up at an antiques mall back in the 90s. Obviously, JM was disappointed when I told him I was "stripping" and he came home to find me wearing a protective facemask and gloves and spraying noxious chemicals all over our patio, but he and I were both pretty pleased with the results- a mirror for our hallway that is very chic and decidedly not too shabby. And while I may not be able to finish the Times crossword puzzle anymore due to brain-cell death, the process was surprisingly easy.  Here's how to strip and refinish wood furniture (the stripping process is similar for metal, but the finishing would be different). I may just get started on.... wait, what was I talking about, again?

Step 1:Apply the stripper directly onto the painted surface. I used a spray stripper, but I've heard that there are paste/gels that work very well. I'm fake posing for the picture, but if you are actually using this stuff definitely wear gloves (trust me- this stuff will burn a whole in your hand). Spray it all over- don't be shy about it.


Step 2: After the amount of time specified on the container (usually 5-10 minutes) you'll notice that the paint is bubbling away from the surface. Use a plastic throw-away scraper trowel thingy to scrape off the paint. This is a very satisfying process. When you finish, there will likely be a few stubborn patches (usually in corners and seams). Just apply more stripper to those spots, and repeat the process.


Step 3: Using a fine sandpaper, sand the whole piece, removing any last bits of paint and varnish that are on there. Be thorough, lazybones.


Step 4: Using a disposable brush (and wearing those gloves again, please), apply a stain to all of the wood. Let it sit for 10 minutes, then wipe it off with a clean rag. If you would like it be to darker, repeat this process until you have reached your desired shade.  Let dry completely (at least overnight).  If desired, apply a coat of polyurethane finish to give it a glossy look.

Enjoy the stripshow.

Tuesday, April 6, 2010

Go With the Flowers


Everyone likes to receive a bouquet of flowers- it's one of those human universals like blinking or yawning when someone else does. But not everyone likes to pay for pre-assembled bouquets that contain a lot of fillers and tend to die quickly. That's more subjective, like whether you like reggae, or creamy or chunky peanut butter. In case you are wondering, the answers for me are yeah, mon and chunky and I hate buying those bouquets. But by the time I usually get around to purchasing a bouquet, I'm typically already late to the dinner party, or the airport or the hospital, or piano recital or whatever, and my options are typically limited to whatever they are selling at my corner deli.

Deli flowers might seem cheap, but if you know what to look for, you can walk out with a fresh, beautiful bunch that isn't expensive. And with minimal labor, you will be able to transform it so it looks like it came from a fancy florist, with no one the wiser.  And as a bonus, you can pick me up some chunky peanut butter while you're there.

1. Read my tips for choosing the freshest blooms at the deli, then go buy some. I got all of the flowers above for $25, and that included a splurgey bunch of renunculus that I just couldn't resist.  Try to stick within a color palette- I chose a springy mix of yellows and pinks- it will keep the bouquet looking sophisticated.

2. When you get the flowers home, remove the plastic protector sleeves and rubber bands.

3. Remove any wilty leaves from the stems, as well as any that branch off from the lower half of the stem. This will keep them from rotting in the water and shortening the flowers' lifespans.

4. Mix up the blooms, aligning the blooms at the same height. I like to put clusters of similar flowers together, and make sure the colors are roughly evenly distributed. Trim the stems to the same length at the bottom.

5. Wrap the bouquet in tissue paper. Start with the bouquet on a diagonal across a few sheets of tissue, then fold the bottom corner up over the stems and wrap the sides around the bouquet tightly. Tie with a pretty ribbon to keep it all together.

6. Present them to the sick, pregnant, traveling, pianist hostess, and watch her delight!

Friday, March 26, 2010

A Banner Day

Yesterday, I posted about my niece's 1st birthday party and the banner garlands I made to decorate. Today, I thought I would walk you through the super-easy steps to make one for yourself! What's cute about the banners is that they can be made in any color combo and instantly add a festive party vibe to any space, be it a Manhattan apartment or a suburban park (oooh, I just got cute tingles thinking about a bunch of these strung from trees over a picnic table). I could see them at a birthday, shower, or anniversary party, or even at a playful wedding. You could also add a letter to each flag to spell out a cute message ("Just Married"?), or the name of the birthday boy or girl.  I think they'd also make for cute decorations in a kid's bedroom, or as a pretty sweet alternative to a mobile over a baby's crib. But don't read anything into that- I'm still very happy just celebrating other people's banner occasions!

You Will Need:
Scissors
Pencil
Various colors and patterns of construction or scrapbook paper
Glue stick (if you are using one-sided papers)
Japanese or regular hole punch
Length of twine, cord or ribbon


Step 1: Make a triangle template for your banners. I used a junk-mail postcard to make mine. I simply measured the center of one side and cut diagonally to each of the opposite corners.  You could make your triangles longer or bigger according to your taste (or really tiny would be adorable, too).


Step 2: Use your template to trace your triangle shape onto your papers (hint: if you reverse the direction of the triangle each time, you will waste very little paper). If you are using patterned papers that are printed on only one side, use a gluestick to attach them back-to-back before you trace your triangles.


Step 3: Following your pencil lines, cut out the triangles. If you are a perfectionist, you can use an Exacto blade and a cutting mat, but I found that scissors did the job just fine.


Step 4: Punch a hole in each of the upper corners of the triangle. I used a Japanese hole punch to make a smaller hole, but I think a regular hole punch would be fine.
Step 5: Wrap the end of your twine, cord or ribbon with tape, and snip off the end to form a stiff end that won't unravel (like on a shoelace).


Step 6: Thread the cord through each of the holes on each flag, always going in on the left, and coming out on the right. Slide the flags to the end of your cord and space them evenly.  Try to create a random assortment of the colors and patterns- it will look cuter if you don't follow a set order.  Drape them from the ceiling and have a party!

Tuesday, March 23, 2010

Branching Out

Not a moment too soon, spring has sprung and the dreary days of winter seem to be behind us (at least until next year). Somehow, it seems like those first rays of sunshine feel the warmest, the first ripe seasonal fruits taste the sweetest, and the bright blossoms that seem to be popping out on every tree are the prettiest. While it's fun to get outside during this time (I spent the whole weekend out defiantly revealing my blindingly-white legs in shorts), it's also nice to find ways to bring that spring cheeriness inside. And the best way to do that is to throw open all the windows and bring in a big blossoming arrangement of blooming branches.
Budding branches are available all over at farmer's markets and flower stands (I got all of these forsythia branches for $5!), or you can go out with your pruning sheers and lop some beauties off the bushes and trees in your backyard (attention city dwellers: do not try this in public parks- it's illegal). 
Here are some techniques to make a beautiful, long-lasting springy arrangement with blossoming branches, with enough drama to distract everyone from your pasty-white skin (trust me- it works!)
 1. Select your branches.  Try to find full, straight branches of approxamately the same length, with lots of buds on them.  Look for buds that haven't blossomed yet to get the most milage out of your branches.
2. When you get them home, use pruning or floral sheers to trim the bottom of the branches off. Because they came from a live tree or bush, sapped-over or dried-out stem needs to be trimmed in order for the branch to be able to drink water.
3. Fill a vessel with cool, clean water, and add 1 cap-full of pure bleach to the water (this will help keep the water fresh). Arrange the branches in the vase- don't worry if it turns out wonky or asymmetical- it's that kind of natural organicness that makes arrangements like this pretty. Don't crowd the branches too much- remember to leave room for the flowers to open.

4. That's it! Replace the water (and remember to add bleach) every few days, and your blooming branches should last for weeks- just as long as the ones still attached to the trees. It's certain to put a little spring in your step (and in your living room, too).

Monday, February 1, 2010

A Living Hall

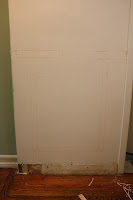
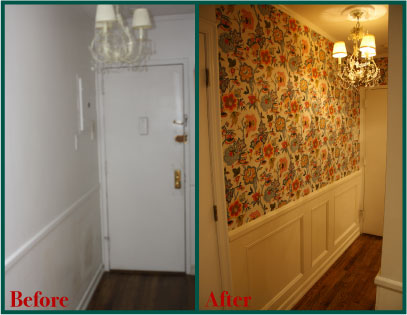
I spend most of my time on this blog talking about the little day-to-day things I do around here just to make sure we have food to eat and clean clothes, and that we don't step on sharp or squishy things on our way to the bathroom in the middle of the night. And, trust me, there's enough of that kind of chores to keep me plenty busy every day. But along the way, I am also in the process of tackling bigger projects while fixing up and decorating our apartment. Some things I save up to pay experts to do (like refinishing our wood floors - not that I think I couldn't do it myself, I'm just pretty sure I wouldn't want to), but others I research and tackle myself. Okay, and sometimes I make my mom help me when she thinks she's just coming for a fun visit, as is the case with the facelift we gave our entrance hall this fall (better than Heidi Montag's, I contend). There are a lot of wonderful details in our prewar walk-up apartment that make it feel special and distinct. Sadly, our entrance hall was not one of them. It was boring, bland and white, with (before I installed the chandelier) ugly recessed lighting, and a big, ugly electrical box that stuck out like a sore thumb.
Once you made your way past the hallway, you were able to see the loveliness within, but, I was always a little disappointed in the dreary first impression the hallway gave. To liven it up, give the hall its own identity, and take advantage of the tall ceilings, I decided to add wainscoting on the lower part of the walls, and a bright, peppy wallpaper above it. After a lot of nail-biting, and navel-gazing, and hemming and hawing, and inner-contemplation, vacillation and dithering, I finally settled on a paper, with which I am unequivocally pleased. (The wallpaper is Favenay Cream from Pierre Deux. I painted the wainscoting Benjamin Moore Navajo White in Semi-Gloss to match the background of the paper). The results were better than I had imagined, and, as an added bonus, the vibrant pattern on the wallpaper works as virtual camouflage for the electrical box. Here are the simple steps to get this same look for your apartment or house - you will need some basic tools (even if you have to buy them, it will still cost way less than paying someone to do this for you) and carpentry skills (which you can learn by doing), and one free weekend (or, maybe less, if you are able to rope your mom into the project).

You Will Need:
Tools:
measuring tape
chalk
stud finder
hammer
finish nails
nail sinker
drill
wood screws
handsaw and miter box
jigsaw (optional, but helpful)
level
Spackle

Lumber: (quantity of all lumber will depend on the size of the area you are covering):
1" x 6" or 1" x 8" boards
Baseboard molding (click on links for examples, if you don't know what I'm talking about)
Chair-rail molding
5/8- 3/4" decorative molding


Step 1: Remove any molding that is currently on the wall (I use a hammer and a flat-head screwdriver driven between the molding and the wall- it'll pop right off). Use your measuring tape and chalk to arrange the dimensions of the molding, until you are happy with it (Just remember that a 1x6 is actually only 5-1/2 inches wide, and a 1x8 is only 7 -1/4 inches wide).


Step 2: Measure and cut a length of 1x6 exactly the length of your wall (remember- measure twice, cut once!) Use the stud finder to find the studs in the wall, and attach the piece of 1x6 to the wall using your drill and wood screws, driven into the stud at the top of where you want your wainscoting to be. Make sure it is level. Do the same with the side and bottom pieces. Make sure you sand the ends of your cuts so they meet up as smoothly as possible.


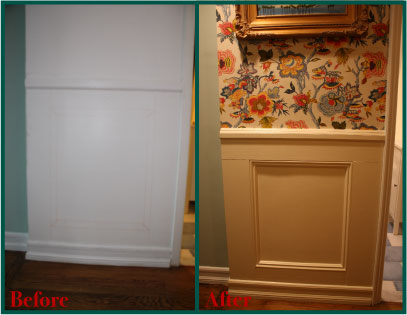
Step 3: Cut a piece of chair rail the width of the wall, and attach it to the very top of the front of the 1x6 frame. Measure a piece of the floorboard, and do the same. Measure and cut the decorative molding to fit the interior of the 1x6 frame. Use the miter box to cut the ends at 45 degree angles, so the four pieces fit inside at right angles. Nail these in with finishing nails and use the nail sinker to sink the nails into the wood. Don't worry if everything doesn't line up perfect-perfect- that's what the Spackle is for. Use it now to fill in any gaps and all the nail holes- this is a good job for Mom. Paint all of the molding with a primer.
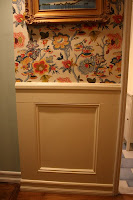


Step 4: Be sure to paint the wainscoting completely before wallpapering the upper portion of the wall, so you don't have to worry about getting paint on it. I'll do another post about how to wallpaper, but this should keep you and your mom busy for a while.

Monday, January 11, 2010

Terrific Terrariums

I do alright with my terrace gardening, but I seem to have a real brown thumb when it comes to houseplants. For some reason, I can't ever seem to find the right balance of sun and water for my little green friends, and they tend to either end up shriveled and crispy or soggy and limp. For a while I gave up and was just sticking with cut flowers, since I didn't feel so bad when they croaked. But that gets expensive, and I money doesn't grow on trees (and even if it did, I probably wouldn't be able to keep my money tree alive, and that would really be depressing). So, I rethought my strategy, and I'm now in the market for fool-proof easy-care indoor plants. I've had luck with orchids, but you can only have so many in your house without it starting to look like you've modeled your decor after some eccentric's greenhouse. I've spotted beautiful, charming terrariums in a lot of places, and I did a little research, and found out that, if you build them properly, they practically take care of themselves. That's my kind of gardening.

Here are the fool-proof (take it from the fool herself) and super-dooper easy instructions for how to build your own terrarium.

1. Gather your materials: you will need gravel or pebbles, charcoal or carbon, potting soil, moss, and small plants. I bought the pebbles and carbon at the pet store (in the aquarium section), and the potting soil, moss, and most of the plants at the garden center. I also picked up a couple of small plants at the pet store in the reptile section (they tend to have a lot of appropriately small ones there). You may have to rehydrate the moss- just soak it in water and it will perk right up. You will also need a glass vessel to build your terrarium in. The three I made used an apothecary jar (above left) from Michael's, a trifle dish from Williams-Sonoma, and a simple Ball jar.


2. Put about a 1" layer of gravel or pebbles in the bottom of your vessel- this provides drainage so the plants don't sit in too much water (since the vessel doesn't have drain holes).


3. Place a thin layer of carbon over the pebbles. This filters any impurities from inside the glass, and will keep the environment healthy and clean. This is especially important if you are using a closed vessel.


4. Place a layer of potting soil over the carbon. You will need at least 1", and the stones, carbon and potting soil together should fill the vessel up about 1/3 of the way.


5. Inspect your plants carefully for bugs and dead leaves, and remove them, as any decay will be detrimental to your little ecosystem. Plant them in the potting soil. If you can't fit your hand into the vessel, you can use salad tongs to gently arrange your plants.


6. Cover the dirt around the plants with small pieces of moss. The tongs can come in handy here, too.


7. Use a spray bottle to dampen the plants' leaves and the moss. Do not over water- a little goes a long way in a closed environment. Use a paper towel to wipe any dirt off of the sides of the glass.


8. Put the cover on the vessel (if it has one). Open up the vessel and spray it with water once a week or so, or whenever the moss starts to look like it's getting dried out. Remove any dead plant material that you notice. If your vessel doesn't have a lid, you will need to monitor the moss, and water more frequently. Now sit back, relax, and enjoy an indoor garden that even a fool can't ruin.

Monday, December 14, 2009

Hangin' Around

Here's a quick holiday decorating idea for those of you with doors. A wreath, garland or bouquet of greens looks lovely, festive and charming, and is a welcoming sight for your holiday visitors. But, if you rent your house, or live in an apartment building where you are required to have metal doors, it can be tough to figure out how to hang them. Those over-the-door wreath hooks are, frankly, kind of ugly, and can obstruct the way your door opens and closes. Instead, use this simple method that requires nothing more than a pretty ribbon:

1. Tie a long piece of ribbon to the door decoration. Use a regular knot to make sure it is well-attached, and then cover that with a pretty bow.
2. Run the ribbon over the top of the door. Pull the ribbon on the backside of the door until the decoration is the height you would like, and is centered left to right.
3. Tie the end of the ribbon to the doorknob on the inside of the door. Again, tie a knot to make sure it is secure, and cover it with a pretty bow. The friction on the top of the door will prevent the ribbon from slipping.

That was easy!

Thursday, December 10, 2009

Tree's Company

Now that I'm back in New York, I really have to kick into gear with my Christmas preparations. I was so distracted by my planning for my trip to California and running the marathon that I honestly haven't done a thing about Christmas and New Year's. Time to get rolling on the gift-buying, party planning, and home decorating, stat. Today, I am buzzing around like one of Santa's elves, unpacking, cleaning, and digging out all our Christmas stuff from storage. And tonight, JM and I are going out to buy our tree. While I'm excited, I'm still smarting from trees of year's past, which have completely dried out, and become stiff, grayish messes by the middle of December. They didn't look too hot, were a major fire hazard, and you should have seen the trail of pine needles I had to vacuum up going all the way down the building's stairs when we finally got rid of them. So, this year, I finally did my research, and realized all of the mistakes I have made with previous years' trees, and am determined not to make them again. Here's how to keep a Christmas tree (or Hanukkah bush) fresh, green and alive (at least until the holidays are over).

1. Buy Fresh. Try to get a tree that has been cut down in the last three days. That can be tough if you live in, say, Arizona, but if you ask the vendor ahead of time, they will generally be honest with you about how long trees have been sitting around, and when there are new deliveries arriving. If you time your trip to the Christmas tree stand according to that schedule, as an added bonus, you'll also get first dibs on that perfectly shaped tree before anyone else sees it.
2. Slice Job: Before you take your tree home, have the seller slice off the bottom of the trunk for you. When a tree has been out of water for more than a few hours, the trunk saps up, leaving it unable to absorb water. A fresh cut will make your beauty ready to soak up water.
3. The Water, the Whole Water... When you get your tree home, put it in a stand with a reservoir that holds at least one gallon of water. A tree can drink up to a gallon a day, so make sure you refill it every night (relax, it's only for a couple weeks). Never let the water level get lower than the bottom cut of the trunk, as any exposure to air will allow the cut to sap up, and you will have to re-cut it to get it to absorb water again. I always use my lemonade pitcher for this task- it pours evenly and keeps me from spilling water all over the floor.
4. ...And Nothing But the Water. No matter what you have heard, adding things to the tree's water like aspirin or bleach doesn't keep the tree fresher longer. In fact, it can have the opposite effect. Just give the tree water, and it will be happy. Well, as happy as something that has been chopped down can be.
5. Cool It. Don't put your tree right next to your fireplace (this is a hard one for us, since we have fireplaces in almost every room... yes, I am bragging about my fireplaces again), or anywhere where it will be exposed to too much hot air (like on top of your radiator's floor vent, as I did last year - oops). Surprise, surprise, dry, hot air will cause your tree to dry out. Likewise, the large-bulb Christmas lights emit far more heat than the small ones, so avoid them if you can possibly resist.

Learn from my mistakes, and you'll have a gorgeous, green, living tree. Or don't, and at least you'll end up with some great kindling.

photo credit: Country Living

Wednesday, November 11, 2009

Silly-houettes, Part 2

I know that maybe the whole silhouette thing is getting a little played-out on this blog, what with this post, and this post, and my banner... But before I can put the whole topic to bed once and for all, I feel compelled to show the full how-to and results of my own little project.
For the how-to, I'll show you how I made Skipper's silhouette. It's one in a series of silhouettes we are doing for our salon wall (a topic for a future post) of all of our family and friends. I still think that it's such an easy project, and makes for a really sweet and personal decoration or gift. For ours, I opted for the classic black-and-white look, but I also made one of my brother, sister-in-law and their baby in pastels that hangs in her nursery. And I love the look when done in bright colors or even patterns.


Step 1: Take a cute picture of your little friend in profile. Open the photo in Adobe Illustrator. For the low-tech version of these instructions, click here.


Step 2: Using the pen tool on a second layer, trace the outline of your friend. Print the outline on plain paper and scale it until it perfectly fits your frame. Reflect the image, so it prints the opposite side of how you want it. Print it on the final paper you intend to use in the real project.


Step 3: Using small sharp scissors, cut out the silhouette, moving slowly and staying exactly on the lines.


Step 4: Use a glue stick (remember to put the glue on the "wrong" side), to adhere the silhouette to the background paper you are using.


Step 5: Place the glued paper in a heavy book to dry. The pressure of the pages will prevent the paper from puckering or peeling away. If you use a standard glue stick, it should be dry within 20 minutes.


Step 6: Place the silhouette in your frame of choice, and hang up your new unorthodox family portrait proudly in your house.

There. It's out of my system.