Showing posts with label eat your heart out bob vila. Show all posts

Thursday, September 16, 2010

It's A Sign

In case you were wondering what I was up to during that lengthy period of time in August when I was not posting on the blog regularly, here's the answer: projects. Oh, sure, I did I certain amount of reading, suntanning and swimming (with the occasional wedding thrown in for good measure), but for the most part, when my mom and I get together, we end up doing projects. It's probably a good thing that we don't live in the same town because JM and my dad would forget what we look like without sawdust in our hair and paint on our faces. And this summer, one of our projects was creating signage. My family's lake cottage is in an old self-managed association where most things have a lovable, decaying, well-used quality to them. This year, we decided to class the place up a bit by replacing some of the more decomposed wooden signage that had been around since the (first) Roosevelt administration, and had become, essentially, unreadable. I like old signs as much as the next guy, but here's a tip: When you can't read them anymore, it's time to throw in the towel. But why hire a sign-maker, when you can easily make your own professional(ish)-looking painted signs yourself? With simple materials you can easily find, you can make signs for whatever your heart desires- house names, street numbers, "keep out- no boys allowed" for your treehouse- the possibilities are endless. Here are the easy-peasy steps we took to make our fancy new signs. And may they happily point the way and rot until my great-great-grandchildren replace them.


What you will need:
A piece of wood, cut to size
A computer print-out of what you want the sign to say, sized to fit
A piece of graphite transfer paper
Acrylic paint and a small flat-sided paintbrush
Varnish and a disposable sponge paintbrush

What you do:
  Step 1: Using your computer, print out the lettering for the sign in the size and font that you like (you may have to print it in several pieces and tape together, as I did). Place a piece of graphite transfer paper, graphite down, on your wooden board. Place the print-out on top, aligning how you like, and attaching it with tape to secure.
Step 2: Carefully trace the lettering on the print-out with a sharp pencil, pressing firmly. In case the photo at left has you perplexed, I do not have teeny-tiny hands- that is just an abnormally large pencil. For your purposes, any size pencil will do. Even a pen would probably be fine, come to think of it.
Step 3: Remove the print-out and graphite paper. I could have omitted this photo, and almost did, because it doesn't really illustrate anything and reveals that I messed up the placement of my graphite paper, and didn't transfer the top half of the word "courts". But I didn't because I wanted to show that everyone makes mistakes when doing projects, and it's no big thang- just fill in the tops of the letters freehand, and get on with it.Or, just place your graphite correctly in the first place.

Step 4: Using a thin paintbrush and your acrylic paint, carefully fill in over the lettering. The paint will cover the graphite. If you smudge, you will be able to wipe up the paint as long as it is still wet, so keep a rag at hand. Also, imperfections are part of the charm of homemade signs, so relax.


Step 5: Allow paint to dry completely. Cover entire piece of wood with varnish, and allow to dry until set. Hang or place your masterpiece and revel in your handiwork.

Friday, April 30, 2010

Stripper Lessons

Back in 2003 when I moved to New York, I was going through a real "Shabby Chic" phase where put linen slipcovers on all my furniture and painted everything white. Now that I'm a little older (ugh, where did those seven years go?), and have developed a more complex sense of style, it kills me to look at all that white paint and think of the pretty mahogany or oak hidden underneath it. So, slowly but surely, I am determined to remove as much of it as I can from the pretty antique pieces worth saving. I had been warned that stripping furniture is a messy, unpleasant and toxic job. To be clear, just breathing near these chemicals will likely take a few hours off your lifespan (just don't say I didn't tell you so when you're all light-headed afterward).  Ah, the price we pay for beauty. 

So, I decided to start small and strip a pretty mohogany mirror that my mom and I had picked up at an antiques mall back in the 90s. Obviously, JM was disappointed when I told him I was "stripping" and he came home to find me wearing a protective facemask and gloves and spraying noxious chemicals all over our patio, but he and I were both pretty pleased with the results- a mirror for our hallway that is very chic and decidedly not too shabby. And while I may not be able to finish the Times crossword puzzle anymore due to brain-cell death, the process was surprisingly easy.  Here's how to strip and refinish wood furniture (the stripping process is similar for metal, but the finishing would be different). I may just get started on.... wait, what was I talking about, again?

Step 1:Apply the stripper directly onto the painted surface. I used a spray stripper, but I've heard that there are paste/gels that work very well. I'm fake posing for the picture, but if you are actually using this stuff definitely wear gloves (trust me- this stuff will burn a whole in your hand). Spray it all over- don't be shy about it.


Step 2: After the amount of time specified on the container (usually 5-10 minutes) you'll notice that the paint is bubbling away from the surface. Use a plastic throw-away scraper trowel thingy to scrape off the paint. This is a very satisfying process. When you finish, there will likely be a few stubborn patches (usually in corners and seams). Just apply more stripper to those spots, and repeat the process.


Step 3: Using a fine sandpaper, sand the whole piece, removing any last bits of paint and varnish that are on there. Be thorough, lazybones.


Step 4: Using a disposable brush (and wearing those gloves again, please), apply a stain to all of the wood. Let it sit for 10 minutes, then wipe it off with a clean rag. If you would like it be to darker, repeat this process until you have reached your desired shade.  Let dry completely (at least overnight).  If desired, apply a coat of polyurethane finish to give it a glossy look.

Enjoy the stripshow.

Monday, February 1, 2010

A Living Hall

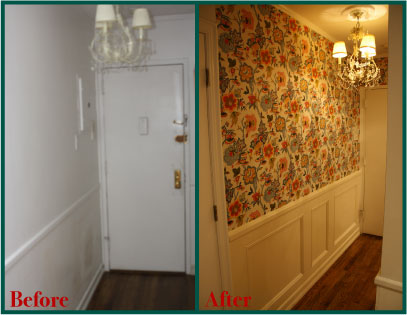
I spend most of my time on this blog talking about the little day-to-day things I do around here just to make sure we have food to eat and clean clothes, and that we don't step on sharp or squishy things on our way to the bathroom in the middle of the night. And, trust me, there's enough of that kind of chores to keep me plenty busy every day. But along the way, I am also in the process of tackling bigger projects while fixing up and decorating our apartment. Some things I save up to pay experts to do (like refinishing our wood floors - not that I think I couldn't do it myself, I'm just pretty sure I wouldn't want to), but others I research and tackle myself. Okay, and sometimes I make my mom help me when she thinks she's just coming for a fun visit, as is the case with the facelift we gave our entrance hall this fall (better than Heidi Montag's, I contend). There are a lot of wonderful details in our prewar walk-up apartment that make it feel special and distinct. Sadly, our entrance hall was not one of them. It was boring, bland and white, with (before I installed the chandelier) ugly recessed lighting, and a big, ugly electrical box that stuck out like a sore thumb.
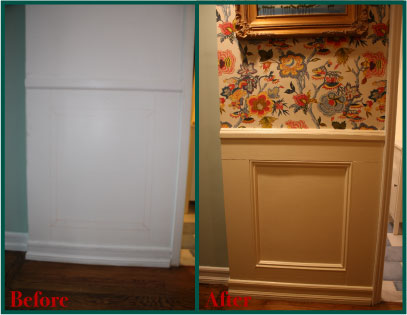
Once you made your way past the hallway, you were able to see the loveliness within, but, I was always a little disappointed in the dreary first impression the hallway gave. To liven it up, give the hall its own identity, and take advantage of the tall ceilings, I decided to add wainscoting on the lower part of the walls, and a bright, peppy wallpaper above it. After a lot of nail-biting, and navel-gazing, and hemming and hawing, and inner-contemplation, vacillation and dithering, I finally settled on a paper, with which I am unequivocally pleased. (The wallpaper is Favenay Cream from Pierre Deux. I painted the wainscoting Benjamin Moore Navajo White in Semi-Gloss to match the background of the paper). The results were better than I had imagined, and, as an added bonus, the vibrant pattern on the wallpaper works as virtual camouflage for the electrical box. Here are the simple steps to get this same look for your apartment or house - you will need some basic tools (even if you have to buy them, it will still cost way less than paying someone to do this for you) and carpentry skills (which you can learn by doing), and one free weekend (or, maybe less, if you are able to rope your mom into the project).

You Will Need:
Tools:
measuring tape
chalk
stud finder
hammer
finish nails
nail sinker
drill
wood screws
handsaw and miter box
jigsaw (optional, but helpful)
level
Spackle

Lumber: (quantity of all lumber will depend on the size of the area you are covering):
1" x 6" or 1" x 8" boards
Baseboard molding (click on links for examples, if you don't know what I'm talking about)
Chair-rail molding
5/8- 3/4" decorative molding


Step 1: Remove any molding that is currently on the wall (I use a hammer and a flat-head screwdriver driven between the molding and the wall- it'll pop right off). Use your measuring tape and chalk to arrange the dimensions of the molding, until you are happy with it (Just remember that a 1x6 is actually only 5-1/2 inches wide, and a 1x8 is only 7 -1/4 inches wide).


Step 2: Measure and cut a length of 1x6 exactly the length of your wall (remember- measure twice, cut once!) Use the stud finder to find the studs in the wall, and attach the piece of 1x6 to the wall using your drill and wood screws, driven into the stud at the top of where you want your wainscoting to be. Make sure it is level. Do the same with the side and bottom pieces. Make sure you sand the ends of your cuts so they meet up as smoothly as possible.


Step 3: Cut a piece of chair rail the width of the wall, and attach it to the very top of the front of the 1x6 frame. Measure a piece of the floorboard, and do the same. Measure and cut the decorative molding to fit the interior of the 1x6 frame. Use the miter box to cut the ends at 45 degree angles, so the four pieces fit inside at right angles. Nail these in with finishing nails and use the nail sinker to sink the nails into the wood. Don't worry if everything doesn't line up perfect-perfect- that's what the Spackle is for. Use it now to fill in any gaps and all the nail holes- this is a good job for Mom. Paint all of the molding with a primer.
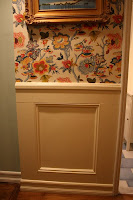


Step 4: Be sure to paint the wainscoting completely before wallpapering the upper portion of the wall, so you don't have to worry about getting paint on it. I'll do another post about how to wallpaper, but this should keep you and your mom busy for a while.